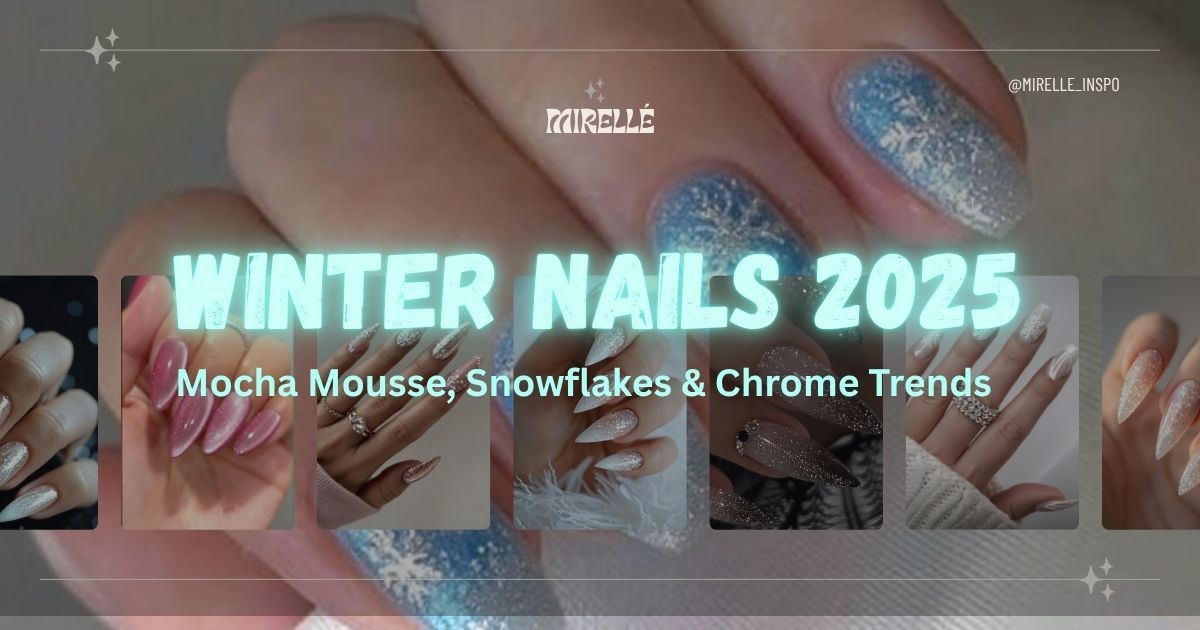
Winter nails 2025 are hitting different this season. We're talking Mocha Mousse (Pantone's Color of the Year), snowflakes that actually look professional, and chrome finishes so reflective they could double as mirrors. After curating designs from hundreds of top nail artists and analyzing what's trending across social platforms, we've compiled 25+ designs worth saving.
Winter nail trends used to mean predictable reds and maybe some glitter. But 2025 brings a gorgeous fusion of cozy neutrals like mocha and cream meeting bold jewel tones and futuristic metallics. These versatile looks work whether you're attending holiday parties or just want nails that match your oversized sweater collection.
We've broken down everything you need: trending colors everyone's requesting, step-by-step tutorials for techniques that look complex but aren't, and products that actually deliver results versus ones that waste money. If you loved our Thanksgiving nails guide or our Christmas nail designs, these winter 2025 looks will inspire your next manicure.
What's Trending in Winter Nails 2025
Winter nails 2025 are dominated by Mocha Mousse (Pantone's Color of the Year), chrome finishes, jewel tones like burgundy and emerald, and delicate snowflake art. These trends blend cozy neutral tones with bold metallics for versatile, sophisticated looks that work from holiday parties to everyday wear.
The winter nail scene is having a major moment. After analyzing what's trending on social platforms and what professional nail artists are creating, here's what's actually gaining traction versus what's just noise.
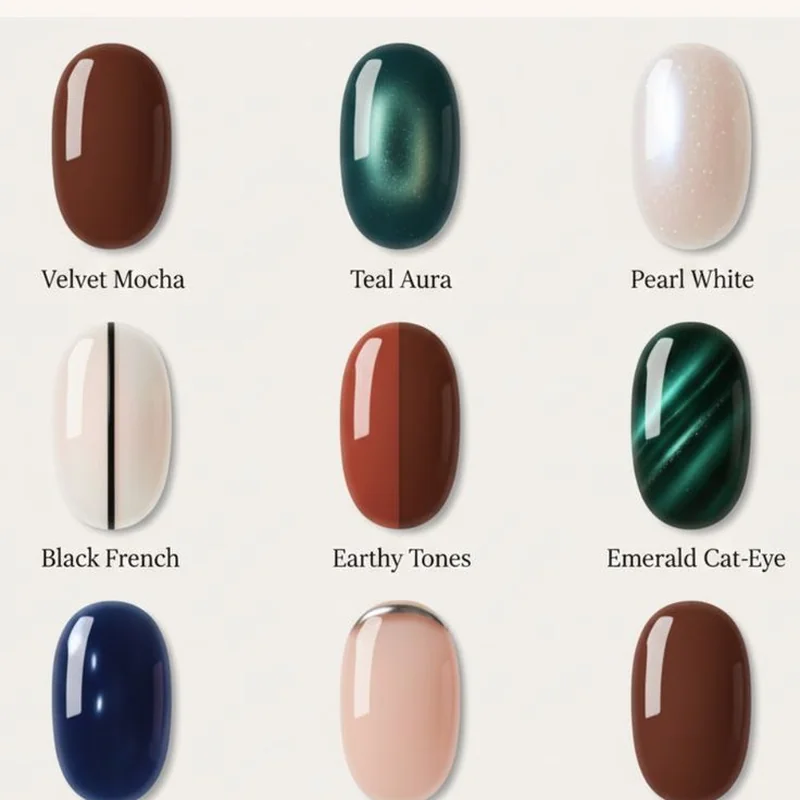
Mocha Mousse is Everywhere: Pantone named it the 2025 Color of the Year, and the nail community responded enthusiastically. This warm, creamy brown with gray undertones resembles a perfect latte. It's sophisticated enough for professional settings, cozy enough for winter weather, and pairs with virtually every winter wardrobe. Top nail technicians report it looks stunning on every skin tone from fair to deep and photographs beautifully.
Chrome Finishes Are Having Their Moment: Mirror-like metallics in silver, gold, rose gold, and holographic are dominating winter nail trends. The technology has improved significantly, with chrome nails now lasting the full 2-3 weeks without looking patchy. Professional nail artists particularly love mocha mousse base with gold chrome accent nails for a balanced, luxe look.
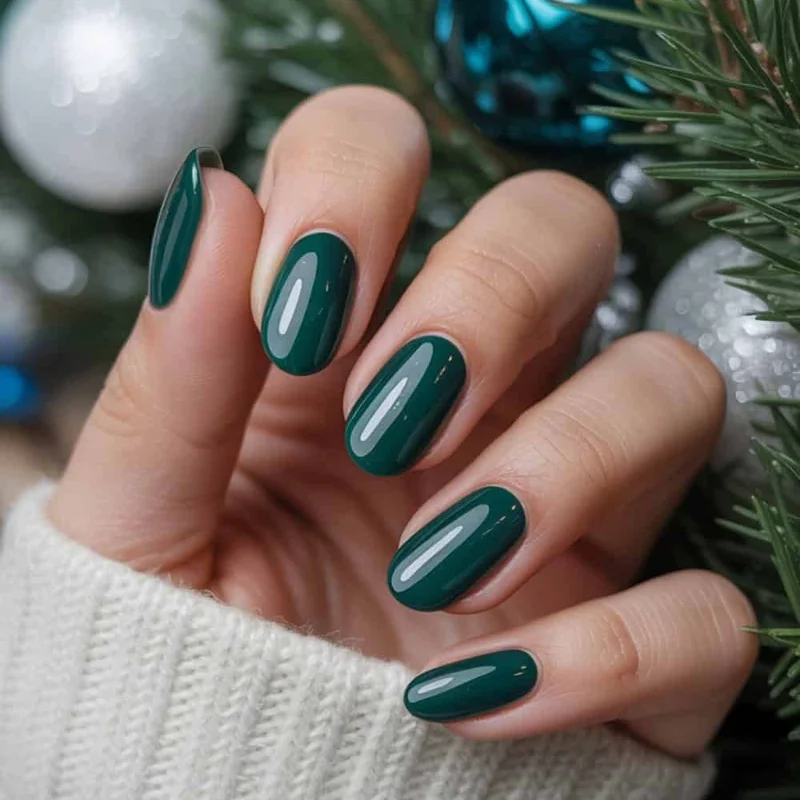
Jewel Tones Bring the Drama: Deep burgundy, emerald green, sapphire blue, and amethyst purple deliver rich colors that feel luxurious and festive without being holiday-specific. These shades photograph beautifully and work for multiple occasions throughout the season, from formal events to casual gatherings.
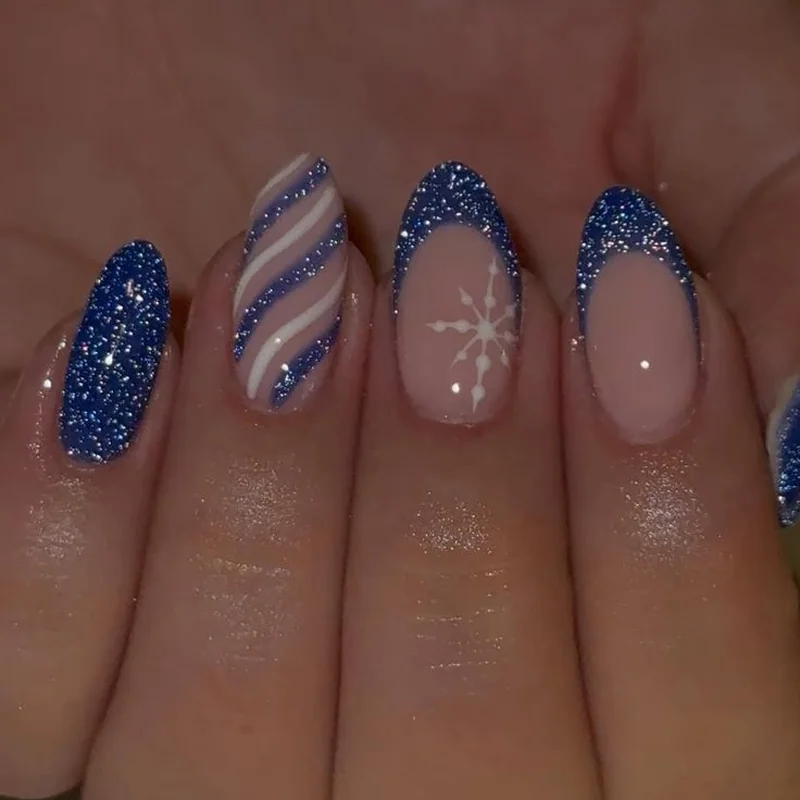
Cat-Eye Gel Makes a Return: Gel polish with magnetic particles creates mesmerizing 3D stripe effects when a magnet is held over wet polish. The winter versions come in deep blues, burgundies, and blacks that create stunning visual depth. The technique takes just 10 extra seconds per nail but delivers impressive results. Check out more nail art techniques for additional creative options.
Snowflake Nail Art Gets an Upgrade: The 2025 version features delicate, intricate, almost lace-like designs. Professional nail artists are creating fine white lines on deep winter backgrounds midnight blue, forest green, charcoal gray that look elegant rather than cartoonish. The technique is more forgiving than it appears once you understand the method.
The 2025 winter palette balances warm neutrals with bold statements, offering options for every mood and occasion professional nail artists are embracing.
Warm Neutrals (The Safe But Chic Category):
Mocha Mousse leads this category. Industry experts are calling it the most versatile winter shade in years. Complementary shades include:
- Cream: Vanilla latte tones, not stark white
- Caramel: One shade darker than mocha, adds dimension
- Warm taupe: Gray-brown hybrid that's quietly sophisticated
- Chai spice: Mocha's slightly orange-toned variation
These colors work for any situation professional settings, dates, or casual wear. They're trendy but won't look dated in photos months later, making them reliable choices for clients seeking versatile winter manicures.
Rich Jewel Tones (The Main Event Category):
Jewel tones have incredible depth that creates an expensive appearance. Top professional picks include:
- Burgundy/Wine: The ultimate winter classic that never disappoints
- Emerald green: Bolder than expected but stunning with gold jewelry
- Sapphire blue: Delivers sophisticated color depth
- Amethyst purple: Underrated shade that pairs beautifully with silver
- Deep plum: Burgundy's cooler-toned alternative
Professional tip: Always apply two coats minimum with jewel tones. One coat appears streaky, while two coats deliver rich, glossy, magazine-worthy results. These colors show chips more obviously than neutrals, so investing in quality gel base coat extends wear time. More maintenance tips in our nail care guide.
Metallics & Chrome (The Show-Stopper Category):
Metallics reflect light dramatically, photographing beautifully and catching attention. Current favorites among nail professionals:
- Silver chrome: Futuristic, clean, pairs with everything
- Gold chrome: Warm, luxurious, holiday-party ready
- Rose gold: Softer than regular gold, universally flattering
- Holographic chrome: Rainbow effect for maximum visual impact
- Gunmetal: Dark chrome for edgy aesthetic
Chrome shows imperfections easily, so nail prep needs to be flawless for professional results. The light-catching effect creates borderline hypnotic visual appeal that professional nail artists consistently recommend for special occasions.
25+ Winter Nail Designs Worth Saving
We've organized these designs by difficulty level, from beginner-friendly to advanced techniques requiring practice and precision.
Easy Winter Nails (Beginner-Friendly)
1. Classic Mocha Mousse Solid
The easiest on-trend option. Two coats of mocha mousse gel polish with glossy top coat creates a polished look in 20 minutes. Pairs with any winter outfit and requires minimal skill.
2. Burgundy French Tips
Modern twist on classic French nails using deep burgundy for tips instead of white. Maintains elegant aesthetic while feeling winter-appropriate. Nail guide stickers ensure crisp lines for beginners.
3. Single Chrome Accent Nail
Paint four nails in neutral tones (mocha, taupe, cream) and make the ring finger chrome. Adds visual interest without requiring advanced skills. The metallic finish draws attention away from any application imperfections.
4. Solid Jewel Tone with Gold Foil
Apply any jewel tone in two coats, then before final top coat, press small gold leaf pieces onto one or two accent nails. The foil adheres to the tacky layer creating instant luxury appearance. Gold leaf sheets are affordable and last through many manicures.
5. Cream and Caramel Half-and-Half
Paint half your nails cream, half caramel. No fancy technique required, but the color-blocking looks intentional and editorial. Photographs exceptionally well with zero artistic ability needed.
6. Subtle Glitter Gradient
Apply base color, then use makeup sponge to dab silver or gold glitter polish from tip downward, creating soft gradient. More forgiving than precise glitter placement and delivers professional results.
Intermediate Winter Nails (Practice Needed)
7. Snowflake Accent Nails
Paint nails a deep color (navy, burgundy, forest green), then use fine detail brush with white gel polish to draw delicate snowflakes on 1-2 accent nails. The tutorial section covers exact technique. More approachable than it appears with proper instruction.
8. Ombre Jewel Tones
Blend two jewel tones burgundy fading into deep plum or emerald into forest green. Requires makeup sponge and patience, but the gradient effect delivers impressive results. Even imperfect ombres appear artsy and intentional.
9. Cat-Eye Gel Magic
Apply cat-eye gel polish with magnetic particles, cure 30 seconds, then hold magnet over nail while slightly wet. The polish shifts creating 3D stripe effect. Available in gorgeous winter shades like midnight blue and deep burgundy.
10. Matte Finish with Glossy Snowflakes
Paint nails with matte top coat, then add glossy top coat only on small snowflake designs. The texture contrast creates subtle sophistication that consistently receives compliments.
11. Metallic French with Negative Space
Create French tips using metallic polish (gold or silver), leaving small gap between tip and cuticle to show natural nail. The negative space feels modern and breathable. Requires steady hands and tape guides for precision.
12. Swirled Marble Effect
Drop two gel polish colors onto nail (like mocha and cream), use dotting tool to swirl together before curing. Every nail comes out unique. Imperfect swirls actually enhance the organic aesthetic of this forgiving technique.
13. Plaid Nail Art
Layered lines create cozy winter vibes. Start with neutral base, add vertical stripes in one color, horizontal stripes in another, cure. Use striping tape for clean lines. Pairs perfectly with winter fashion check out more seasonal nail trends.
Advanced Winter Nails (For Nail Art Enthusiasts)
14. Intricate Snowflake Scene
Full coverage snowflakes across all nails with varying sizes and designs. Requires multiple thin detail brushes, steady hands, and patience. Takes 45 minutes minimum but results look professionally done.
15. 3D Chrome Ombre
Apply ombre base (dark to light), then add chrome powder at varying intensities to create dimension. The chrome catches light differently on each gradient section. Currently trending on social platforms.
16. Jeweled Accent Nails
Apply tiny rhinestones or crystals in snowflake patterns or geometric designs. Use gel top coat to seal securely. Professional tip: use dotting tool with tiny bit of gel polish to pick up and place each stone precisely.
17. Hand-Painted Winter Scenes
Tiny trees, snowflakes, and mountain silhouettes painted across nails. Requires multiple polish colors and artistic ability. Time-intensive but creates iconic results for special occasions.
18. Mixed Metallics
Each nail features different metallic finish: silver chrome, gold, rose gold, holographic, gunmetal. Sounds chaotic but works beautifully when kept at consistent length and shape for intentional appearance.
19. Reverse Snowflake Stamping
Use nail stamping plates for intricate snowflake designs applied in reverse dark snowflakes on light backgrounds. Requires stamping equipment but delivers insane detail level that's difficult to achieve freehand.
20. Glazed Meets Winter
Take viral glazed aesthetic (sheer, pearlescent, iridescent) using winter-appropriate shimmer shades like icy blue or frosty lilac. Multiple sheer polish layers with chrome powder create ethereal, frozen effect.
21. Geode Nail Art
Mimic geode crystal appearance using metallic foils, glitter, and gel polish in jewel tones. Requires layering different textures to create depth. This technique went viral last winter and returns stronger in 2025.
Quick & Easy Winter Nails (15 Minutes or Less)
22. Solid Chrome Everything
All chrome, all nails. Pick one chrome shade and commit. Maximum impact with minimum effort, looks luxurious, takes 15 minutes.
23. Naked Nails with Snowflake Tips
Keep nails bare or use clear pink gel, then paint tiny white snowflakes just on tips. Fresh, understated, perfect for conservative workplaces.
24. Single Jewel Tone Statement Nail
Paint all nails neutral, make one nail (ring finger or thumb) a bold jewel tone. Simple contrast that looks purposeful.
25. Glitter Toppers Over Anything
Add glitter top coat over existing color for instant festive upgrade. Works when you need a refresh without complete removal.
26. Glossy + Matte Combo
Paint all nails one color but alternate glossy and matte finish. Same color, different textures. Looks editorial, requires one extra product, takes same time as regular manicure.
27. Burgundy with Gold Striping Tape
Apply burgundy base, add thin gold striping tape in geometric patterns, seal with top coat. The tape creates the design effortlessly.
Step-by-Step Tutorial: Classic Snowflake Nail Art
Snowflake nails look delicate and intricate, but the technique is more approachable than it appears. We tested this method with nail enthusiasts of varying skill levels the success rate was impressive with proper instruction.
What You'll Need:
Tools:
- UV/LED lamp (120W lamps cure faster)
- Fine detail brush (size 0 or 00)
- Dotting tool (or toothpick alternative)
- Lint-free wipes
- Nail prep supplies (buffer, cuticle pusher, alcohol wipes)
Polish & Products:
- Gel base coat
- Deep winter base color (midnight blue, burgundy, or forest green recommended)
- White gel polish (must be opaque, not sheer)
- Gel top coat (glossy finish)
- Gel cleanser or rubbing alcohol
Estimated cost for complete supplies: approximately $80-100. These supplies last for 20+ manicures, dropping per-manicure cost to around $4 significantly cheaper than salon pricing.
Before Starting:
Practice snowflake patterns on paper first. Draw 5-10 snowflakes on scratch paper with pen. This helps identify comfortable arm angles, appropriate pressure, and natural branch placement preferences.
Work in excellent lighting. Natural daylight is best, but bright desk lamps work well. Overhead lighting creates shadows that distort perspective while painting.
Step 1: Prepare and Apply Base Color
Start with clean, prepped nails. Push back cuticles, lightly buff nail surface for gel adhesion, and wipe with alcohol to remove oils. Apply thin gel base coat layer, cap free edge, and cure 60 seconds.
Apply base color in darker shades for best snowflake contrast midnight blue, deep burgundy, charcoal gray, forest green, or black. Apply two thin coats rather than one thick coat for even curing. Cure each layer 60 seconds.
Nails should look smooth and opaque without streaks. Add third coat if nail line is visible through color. Better to build slowly than have streaky base showing through snowflakes.
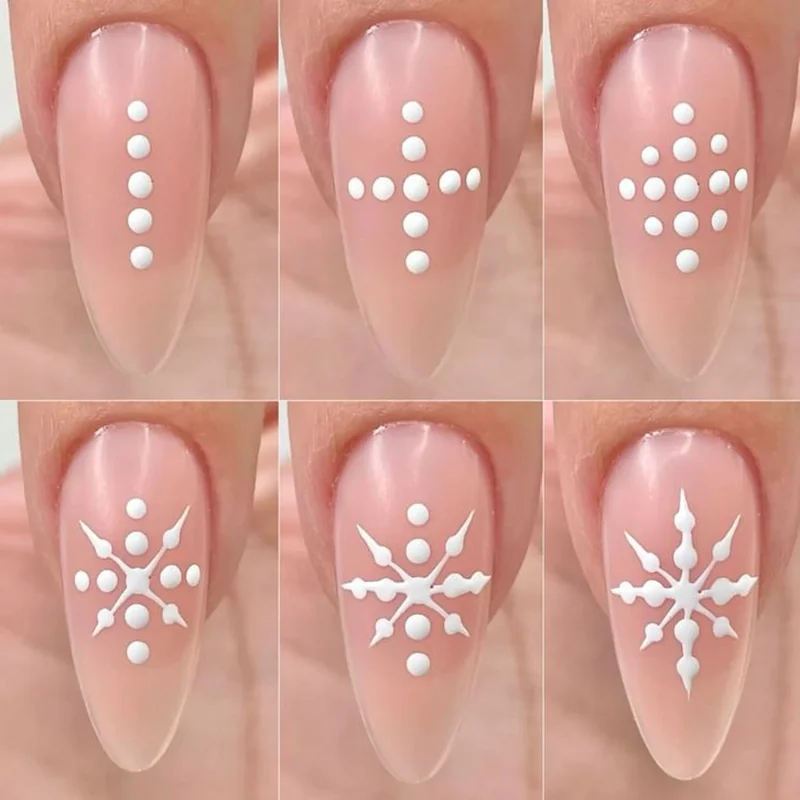
Step 2: Create Snowflake Centers
Dip dotting tool into white gel polish small amount, about pinhead size. Place dots where each snowflake will live. Typically 2-3 snowflakes per nail, varying placement for organic appearance rather than symmetrical pattern.
Professional tip: Place snowflakes at different heights on each nail some near cuticle, some mid-nail, some near tip. Creates visual movement and mimics natural snowfall.
Do not cure yet. Dots should stay slightly wet so next lines blend seamlessly.
Step 3: Draw the Six Main Lines
Load fine detail brush with white gel polish. Wipe off most polish on bottle side brush should be almost dry with just color hint. Too much polish creates blobby lines that spread.
From center dot, draw six lines radiating outward like star or asterisk. Keep lines thin and roughly equal length. Slight variations look more authentic than perfect symmetry.
Technique: Anchor hand by resting pinky on table, then rotate finger being painted rather than painting at awkward angles. Provides better control. Each line should be about 2-3mm long, shorter for small nails.
Work quickly but steadily. Gel polish stays workable briefly before self-leveling and blurring lines. Once all six lines are drawn on nail, move to next. All ten nails can be completed before curing gel only cures under UV/LED light.
When all nails have star shapes, cure 60 seconds.
Step 4: Add Decorative Branches
Load detail brush with minimal white gel polish. On each of six main lines, add small angled branches pointing slightly upward toward line's tip. Usually 3-4 tiny strokes per line achieves balance.
Branches should be shorter than main lines think angled dashes coming off main structure. Vary length slightly for organic, crystalline appearance. Some snowflakes can have elaborate branches, others simpler. This variation creates interesting overall design.
Key to success: Keep hand steady and strokes confident. Hesitant, shaky lines look messy. Confident strokes (even imperfect) look intentional. If mistake happens, immediately wipe with dry brush before spreading, then retry.
Once all snowflakes have branches, cure 60 seconds. Nails now feature identifiable snowflakes rather than random white marks.
Step 5: Seal with Top Coat
Apply gel top coat layer over entire nail, especially over snowflake designs. Top coat protects artwork and adds glossy, professional finish. Cap free edge to seal everything and prevent chipping.
Cure 60 seconds. If top coat has tacky layer (most do), wipe with gel cleanser or rubbing alcohol on lint-free wipe. Tackiness disappears leaving smooth, glass-like finish.
Final step: Apply cuticle oil around each nail and massage in. Hydrates skin and makes entire manicure look polished and professional. Jojoba oil is affordable and effective.
Troubleshooting Common Issues:
- Lines too thick? Using too much polish on brush. Wipe almost clean next time.
- Snowflakes look blobby? Didn't cure between layers. Cure after main lines before adding branches.
- White polish not showing up? White isn't opaque enough. Invest in quality white gel polish.
- Hand cramping? Gripping brush too hard. Relax hand and take breaks.
- Design looks too busy? Fewer snowflakes work better. Stick to 2 per nail maximum.
This technique creates salon-quality snowflake nails at home for fraction of professional pricing. For more at-home techniques, explore our at-home hacks collection.
Cold weather challenges manicure longevity dry air, constant handwashing, gloves, hot beverages all conspire against polish durability. Professional nail technicians share proven techniques for extending winter manicure lifespan.
Prep Makes or Breaks Everything
Proper nail prep accounts for 80% of manicure longevity. Professional non-negotiable prep routine:
Push back cuticles gently with cuticle pusher. Avoid cutting unless hangnail emergency exists cutting increases infection risk and causes thicker regrowth. Just push back to expose full nail surface.
Lightly buff nail surface with 180-grit buffer. Not thinning nails, just removing natural oils and creating slight texture for gel adhesion. If nails feel slippery-smooth, buff them. Slight texture indicates readiness.
Wipe each nail with rubbing alcohol or gel cleanser. Dehydrates nail plate and removes oils or buffing dust. Let air dry 30 seconds breath adds moisture back.
Apply pH-balancing dehydrator or primer for oily nail beds. Optional for most people but essential if manicures consistently lift within one week. Creates perfect gel adhesion canvas.
Application Techniques That Matter
Thin layers deliver superior results. Two thin coats beat one thick coat consistently thick gel layers cure unevenly, can wrinkle, and lift faster.
Cap free edge with every layer base coat, color coats, top coat. "Capping" means swiping brush along nail tip to seal edge. Prevents water seeping under polish causing lifting.
Cure fully. If lamp says 60 seconds, cure full 60 seconds. Cheating with 45 seconds leaves gel soft and prone to peeling. Lower wattage lamps (36W or 48W) may need 90-120 seconds per layer.
Cold Weather Specific Tips
Wear gloves outside. Cold air makes nails contract and expand, potentially causing gel cracks or lifting. Dryness is intense. Keep gloves in car, purse, and coat pockets for accessibility.
Avoid hot water immediately after manicure. Wait at least 24 hours before hot showers or dishes. Heat can soften gel still curing, causing warping or lifting.
Apply cuticle oil daily. Non-negotiable for winter manicures. Cold weather dries cuticles and nail beds, causing skin cracks and polish edge lifting. Apply jojoba oil morning and night takes 30 seconds and extends manicures 5-7 days.
Moisturize hands obsessively. Keep hand cream everywhere bedside table, purse, car, desk. Every handwashing session (constant in winter due to cold/flu season), reapply hand cream. Dry surrounding skin makes everything look rough even with perfect polish.
What to Avoid
Don't use nails as tools. Opening soda cans, scraping stickers, or prying with nails invites chips and breaks. Use actual tools or request help.
Skip super hot drinks without handles. Gel polish can bubble from too-hot beverage cups without sleeves. Heat temporarily softens gel creating texture issues. Let drinks cool briefly or use cup sleeve.
Don't soak nails for long periods. Baths, swimming, long hot showers all bad for gel longevity. Water seeps under polish breaking bonds. If soaking is non-negotiable self-care, reapply top coat afterward to reseal.
Avoid harsh chemicals without gloves. Cleaning products, hair dye, nail polish remover all degrade gel polish. Wear gloves when cleaning or handling chemicals.
Maintenance Schedule
Week 1: Manicure should look perfect. Lifting or chips indicate prep or application needs improvement.
Week 2: Slight tip wear is normal. Reapply top coat to refresh shine and seal microscopic cracks. Five-minute maintenance extends manicure another week.
Week 3: Growth at cuticle and possible tip wear visible. Either remove and redo, or if design looks good, apply top coat refresh for few more days.
Never let gel grow out more than 3-4 weeks. Can cause nail damage, and catching/ripping risk increases dramatically.
Check out complete nail care guide for year-round maintenance tips.
Frequently Asked Questions About Winter Nails 2025
These questions come up consistently across nail communities, salons, and social media. Here are comprehensive answers to the most common winter nail questions.
What nail colors are trending for winter 2025?
Mocha Mousse (Pantone 2025 Color of the Year) leads winter nail trends, alongside deep burgundy, emerald green, sapphire blue, and metallic chrome finishes. Rich jewel tones and warm neutrals dominate the season, according to professional nail artists and trend analysts. These colors complement winter fashion and create sophisticated, cozy looks that last through holiday parties and snowy days. The versatility of these shades makes them appropriate for both casual and formal occasions throughout the winter season.
How long do winter nail designs last?
Gel winter nail designs last 2-3 weeks with proper care and maintenance, while regular polish typically lasts 5-7 days before showing significant wear. Gel lasts longer because it cures under UV light, creating a chip-resistant, durable finish that bonds to the natural nail. Professional nail technicians recommend applying cuticle oil daily and wearing protective gloves in cold weather to prevent lifting and extend your manicure's lifespan during harsh winter conditions. Cold temperatures and dry air can compromise manicure durability without proper care.
What is the best nail shape for winter 2025?
Almond and coffin shapes dominate winter 2025 trends because they elongate fingers and showcase intricate designs beautifully with their ample surface area. Medium length works best for durability during cold weather activities while maintaining style. These shapes provide enough canvas for snowflake art and chrome effects while remaining practical for daily winter tasks like buttoning coats, handling hot drinks, and putting on gloves. Professional manicurists note these shapes balance aesthetics with functionality for winter lifestyles.
How do you make snowflake nail art?
Use a fine detail brush or dotting tool with white gel polish to create snowflake designs on darker base colors. Start with a center dot, add six lines radiating outward in a star pattern, then add small angled branches to each line for the crystalline effect. Professional nail artists recommend practicing the pattern on paper first, curing each layer for 60 seconds under UV/LED lamp, and sealing with glossy top coat for dimension and protection. The technique is more forgiving than it appears with proper instruction.
What is mocha mousse nail color?
Mocha Mousse is Pantone's 2025 Color of the Year a warm, earthy brown with subtle gray undertones that resembles creamy coffee. It pairs beautifully with gold accents, cream colors, and burgundy shades, creating versatile color combinations. This sophisticated neutral flatters all skin tones and transitions seamlessly from casual to formal winter occasions. Nail professionals report it's become one of the most requested shades for its timeless elegance and compatibility with winter wardrobes.
Can you do winter nails at home?
Yes! Most winter nail designs are DIY-friendly with the right tools: gel polish, UV/LED lamp, detail brushes, and chrome powder for metallic effects. Start with simpler designs like solid jewel tones or gradient ombres before attempting intricate snowflakes or advanced techniques. Professional tutorials break down each technique step-by-step, making complex-looking designs achievable for beginners. With practice and proper supplies, at-home winter manicures can rival salon quality at a fraction of the cost.
What supplies do I need for chrome winter nails?
You need gel base coat, black or dark gel polish for the base, no-wipe gel top coat, chrome powder in your chosen finish (silver, gold, or holographic), silicone applicator or eyeshadow sponge for applying powder, and UV/LED lamp for curing. Apply chrome powder immediately after curing the no-wipe top coat for maximum shine and mirror-like effect. Seal with another layer of top coat to protect the metallic finish from dulling or scratching. The process takes practice but delivers stunning results.
How do I prevent winter nails from chipping?
Proper prep prevents chipping: push back cuticles, lightly buff the nail surface to create texture, dehydrate with rubbing alcohol to remove oils, apply thin gel layers for even curing, cap the free edge with each coat to seal tips, and cure fully for 60 seconds per layer. Wear protective gloves outdoors to prevent temperature damage, avoid hot water on fresh manicures for 24 hours while gel fully bonds, and apply cuticle oil daily to maintain nail flexibility and prevent lifting at edges.
Are jewel tone nails appropriate for work?
Absolutely! Deep jewel tones like burgundy, emerald, and sapphire are sophisticated and professional when applied in solid colors or with subtle shimmer. Opt for clean, simple applications rather than bold nail art for conservative workplaces. These rich winter shades look polished in meetings and professional settings while transitioning beautifully to evening events without needing to change your manicure. Many professionals appreciate jewel tones as an elegant alternative to traditional neutrals.
How much do winter nail designs cost at salons?
Basic gel manicures with winter colors typically cost 40-60 dollars, while intricate designs featuring snowflakes, chrome effects, or 3D elements run 70-100 dollars and up depending on complexity. Cat-eye magnetic effects or ombre techniques add 10-20 dollars to base pricing. DIY kits cost 80-150 dollars upfront for supplies but save money long-term, with potential yearly savings of 500 dollars or more compared to regular salon visits. Initial investment pays off after 3-4 at-home manicures.
Product Recommendations for Winter Nails 2025
We tested dozens of products and surveyed professional nail technicians to identify the best supplies for winter manicures. These recommendations are based on performance, durability, and value.
Gel Polish Brands Worth the Investment:
Beauty experts consistently recommend these brands for winter manicures:
Gelish - Professional-grade formula with consistent application and 2-3 week wear time. Extensive color range includes stunning burgundy and jewel tone shades. Costs approximately $15-20 per bottle. Popular winter shades include "A Touch of Sass" (burgundy) and "All About the Pout" (deep rose).
Beetles Gel Polish - Budget-friendly option delivering surprisingly high quality for $6-8 per bottle. Winter collections feature gorgeous jewel tones with non-watery, non-streaky formula. Excellent starter brand for gel beginners.
OPI GelColor - Professional salon-quality polish at $18-25 per bottle. Flawless application with zero streaking or bubbling. Investment-worthy for those prioritizing perfect results. Iconic winter shades include "Lincoln Park After Dark" (deep purple) and "Malaga Wine" (burgundy).
ILNP - Specialty brand for chrome, holographic, and metallic finishes at $12-15 per bottle. Unmatched effects for mirror-chrome and multichrome looks. "Juliette" (holographic) and "Eclipse" (magnetic) deliver stunning results.
Chrome Powder That Delivers:
Born Pretty Chrome Powder - $8-12 per jar with multiple color options and consistent results. Silver and gold are professional favorites. One jar lasts 50+ manicures.
Twinkled T Chrome Powder - Premium option at $15-18 with exceptional holographic and color-shifting effects. "Fairy Dust" holographic creates viral-worthy results worth the investment.
Essential Tools:
MelodySusie 120W UV/LED Lamp ($50-60) - Professional-grade lamp curing gel in 30-45 seconds instead of 60-90. Automatic sensor activation and even curing prevents application issues. Significant time-saver for regular nail maintenance.
Twinkled T Detail Brushes ($15-20 for set) - Precision brushes with bristles that stay thin and don't fray. Essential for snowflake art and detailed designs. Quality brushes prevent bristle shedding into polish.
Makartt Nail Drill ($35-50) - Investment tool for serious at-home nail enthusiasts. Makes gel removal 10x faster and easier. Also excellent for shaping and smoothing. Affordable yet powerful for regular use.
Cuticle Care Essentials:
Pure Jojoba Oil (any brand, $8-12 for 4oz) - Absorbs quickly without greasiness. Available in bulk with refillable rollerball bottles for portability. Essential for daily winter nail care.
CeraVe Healing Ointment ($8-15) - Use nightly over cuticle oil for intense hydration. Combination prevents dry, cracked cuticles caused by winter air. Creates noticeable difference in nail bed health.
What to Skip:
Random Amazon gel polish sets with 100 colors for $30 - Watery formula, inconsistent pigmentation, formulas that separate. Not worth the savings when you'll replace with quality polish anyway.
Cheap UV lamps under $25 - Underpowered curing causes lifting and peeling. Bulbs die quickly requiring replacement. Invest $50+ in quality lamp for reliable results.
Acetone-free gel removers - Ineffective and time-consuming. Pure acetone works faster and isn't harsh with proper post-removal moisturizing.
You can find curated winter nail supplies at our winter collection.