
By Avery Chen - Licensed Nail Technician with 6 years of experience specializing in maximalist nail art and viral trend recreation.
okay but like... goddess nails are EVERYWHERE right now and i am fully obsessed. literally every time i open Pinterest or Instagram, my feed is just gold, pearls, and celestial shimmer as far as the eye can see. and honestly? the maximalist energy is exactly what we need after years of minimalist beige everything.
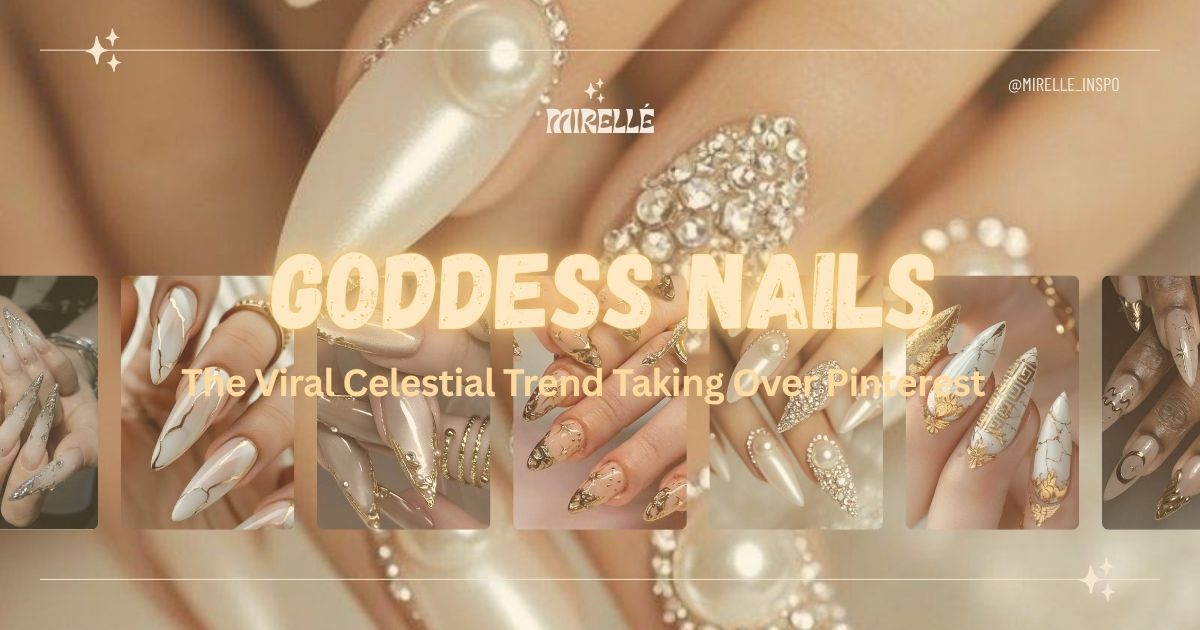
if you have been living under a rock (no judgment, we all need breaks from social media), goddess nails are this insanely opulent manicure trend inspired by Greek mythology and divine feminine energy. we are talking long stiletto or almond nails dripping in gold leaf, pearl embellishments, cat-eye shimmer, and enough luxury to make Aphrodite jealous. it is the complete opposite of clean girl aesthetic and i am HERE for it.
The trend exploded on seasonal nail trends platforms, with Pinterest reporting a 760 percent increase in searches for goddess nails in early 2025. Celebrities started rocking the look on red carpets, influencers couldn't get enough, and suddenly everyone wanted nails that screamed main character energy.
As someone who has done over 1,000 sets of nails in my Culver City studio, i can confirm this is one of the most requested looks right now. clients literally bring me screenshots and are like "make me look like a Greek goddess" and honestly, i love the challenge. these nails require technique, patience, and a good understanding of how to make embellishments actually stay on (because nothing is sadder than losing a pearl two days after your appointment).
In this guide, i am breaking down everything you need to know about goddess nails. we will cover what exactly defines the trend, show you 30+ divine design ideas organized by style, walk through a complete at-home tutorial, answer every question you have been Googling at 2am, and give you the honest tea on what works and what does not. Whether you are a nail tech looking to add this service or someone wanting to DIY these beauties at home, i got you.
What Are Goddess Nails?
Quick Answer: Goddess nails are a maximalist manicure trend featuring gold accents, pearl embellishments, cat-eye shimmer effects, and long shapes inspired by Greek mythology and divine feminine aesthetics. The look combines metallic foils, luxurious textures, and celestial elements to create an opulent, otherworldly appearance.
So here is the thing about goddess nails that makes them different from your standard fancy manicure. This is not just about slapping some gold polish on and calling it a day. The goddess nail aesthetic is specifically about channeling ancient Greek luxury mixed with modern celestial vibes.
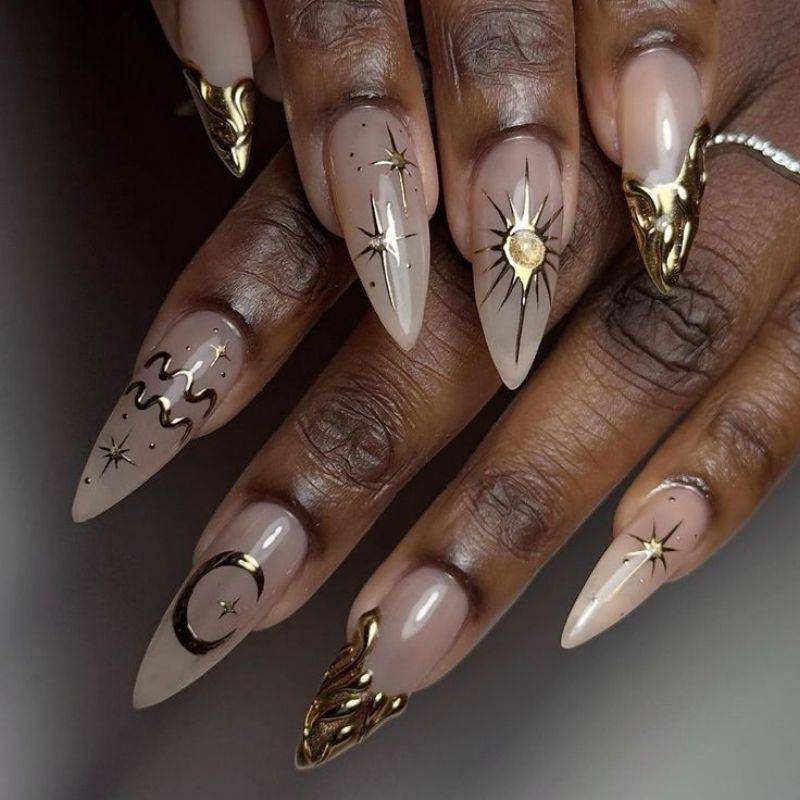
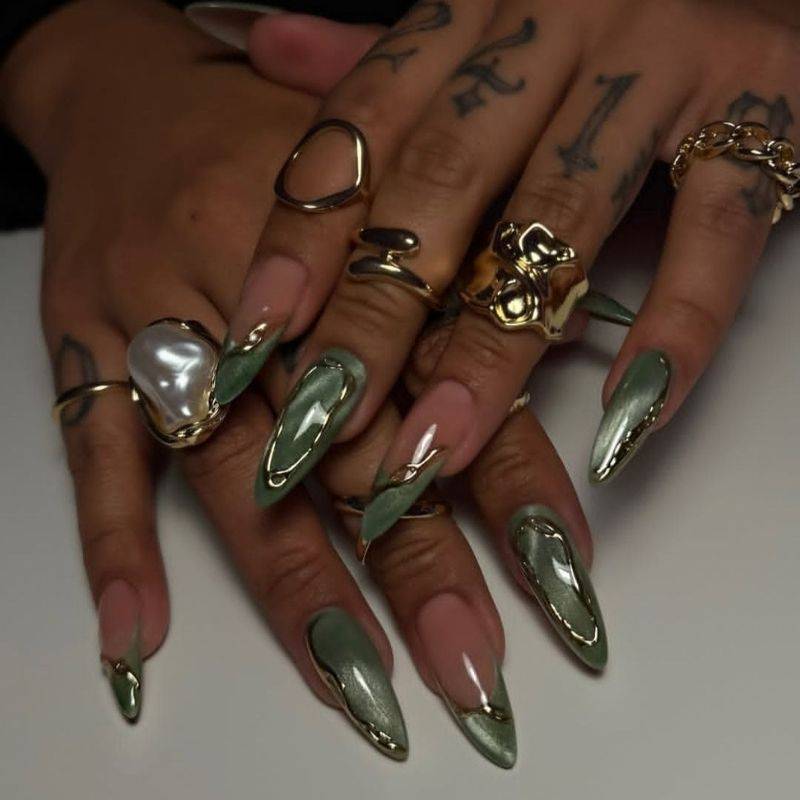
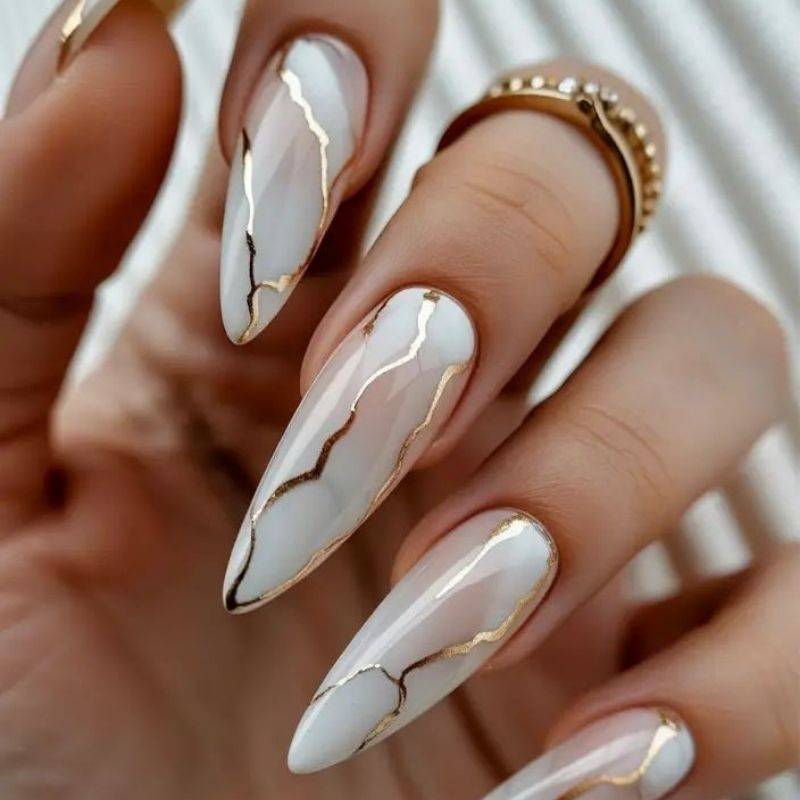
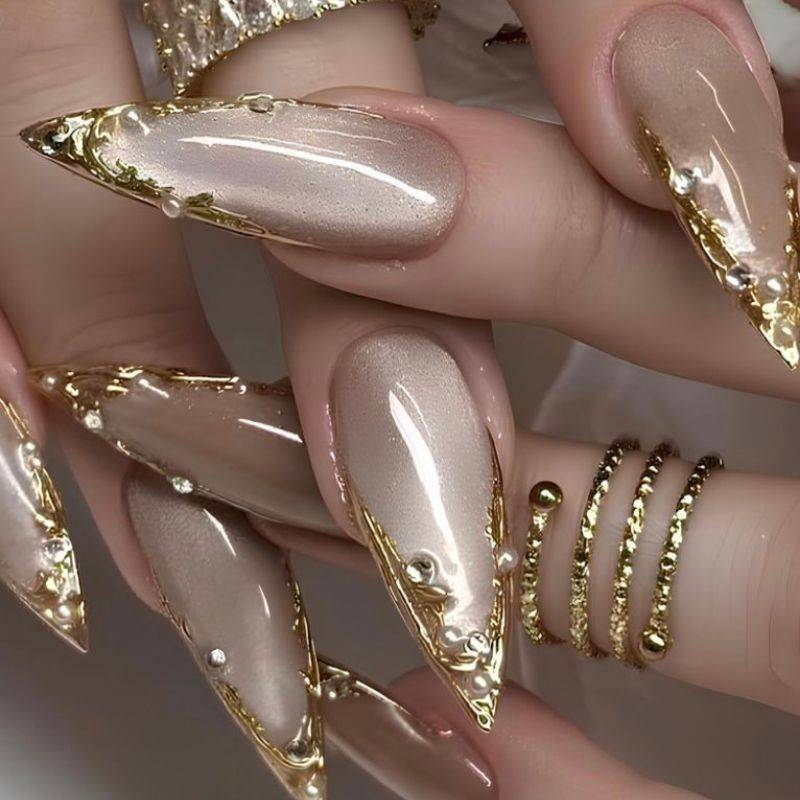
The core elements that define goddess nails include long nail lengths (usually stiletto, almond, or coffin shapes), metallic gold as the primary color story, pearl embellishments in various sizes, cat-eye gel polish for that otherworldly shimmer, and often references to Greek mythology like olive branches, laurel wreaths, or marble effects.
What makes this trend so appealing is the unapologetic maximalism. After years of subtle neutrals and minimalist manicures dominating the nail art scene, goddess nails are giving us permission to go ALL OUT. More is more. Bigger is better. If it sparkles, add it.
The aesthetic also taps into something deeper than just pretty nails. There is this whole cultural moment happening where people are reclaiming feminine power, luxury, and self-expression. Goddess nails are not apologetic or subtle. They make a statement. They say "i am here, i am divine, and i deserve beautiful things."
From a technical standpoint, creating goddess nails requires understanding layering techniques, proper adhesive application for embellishments, and how to seal everything so it actually lasts. I have seen so many DIY attempts where pearls fall off day two because people skip crucial steps. That is why having a solid tutorial matters, which we will get to in a minute.
What is Trending: The Goddess Nails Explosion
let me tell you how FAST this trend took off. Like, i remember back in late 2024 when i first started seeing goddess nails pop up on my Pinterest feed. At first it was just a few images here and there, mostly from European nail artists. Then suddenly by January 2025, it was like a tsunami of gold and pearls everywhere you looked.
Pinterest officially reported that goddess nails saw a 760 percent increase in searches between December 2024 and March 2025. That is INSANE growth. For context, most nail trends see maybe 100-200 percent increases when they go viral. This absolutely exploded.
Instagram hashtags tell the same story. The tag #goddessnails went from a few thousand posts to over 2 million by spring 2025. TikTok tutorials started racking up millions of views. Nail supply companies could not keep gold leaf and pearl embellishments in stock. I literally had to wait three weeks for a shipment of quality gold foil because demand was so high.
What is driving this trend? Honestly, i think it is the perfect storm of several cultural moments colliding. First, we have the ongoing anti-minimalist movement. People are exhausted by clean girl aesthetic, quiet luxury, and all that understated nonsense. We want JOY. We want SPARKLE. We want nails that make us feel like mythological deities.
Second, there is been this huge resurgence in interest around Greek mythology, ancient history, and classical aesthetics. Shows like Percy Jackson, fashion runways doing ancient Greece collections, and even home decor trends leaning into marble and gold accents. Goddess nails fit perfectly into that cultural zeitgeist.
Third, and this is something i have noticed with clients, there is this desire for nails that feel special occasion-worthy even for regular life. After years of lockdowns and missing celebrations, people want to feel fancy going to Target. Goddess nails deliver that main character energy whether you are grabbing coffee or attending a gala.
The celebrity adoption definitely helped too. When Hailey Bieber showed up to an event with pearl-studded gold nails, that was basically the mainstream stamp of approval. Suddenly it was not just a niche nail art trend anymore - it was EVERYWHERE.
Is this clicking yet or am I explaining like a robot? ⚡ Quick reaction: 💡 (got it) or 🤯 (wait what)
30+ Divine Goddess Nail Designs
okay bestie, this is where it gets fun. I am breaking down goddess nails by style categories so you can find exactly what speaks to your soul. Because here is the thing - goddess nails is an umbrella term, and within that there are SO many different vibes you can go for.
Classic Gold Goddess Nails
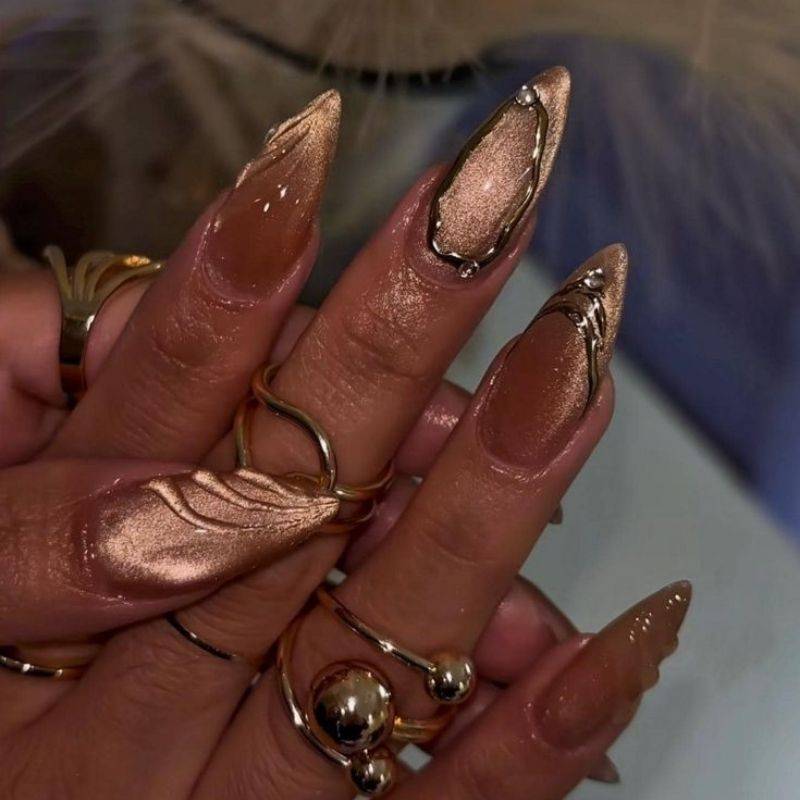
This is your foundational goddess look. Long almond or stiletto nails in metallic gold gel polish, topped with scattered gold leaf pieces that catch the light like treasure. Add a few small pearls near the cuticle area for that divine touch. This is perfect if you want the goddess aesthetic but do not want to go completely over-the-top. It is elegant, timeless, and honestly never gets old. The key here is using quality gold polish that actually looks metallic and not just shimmery yellow. Trust me, there is a difference and your eyes can tell.
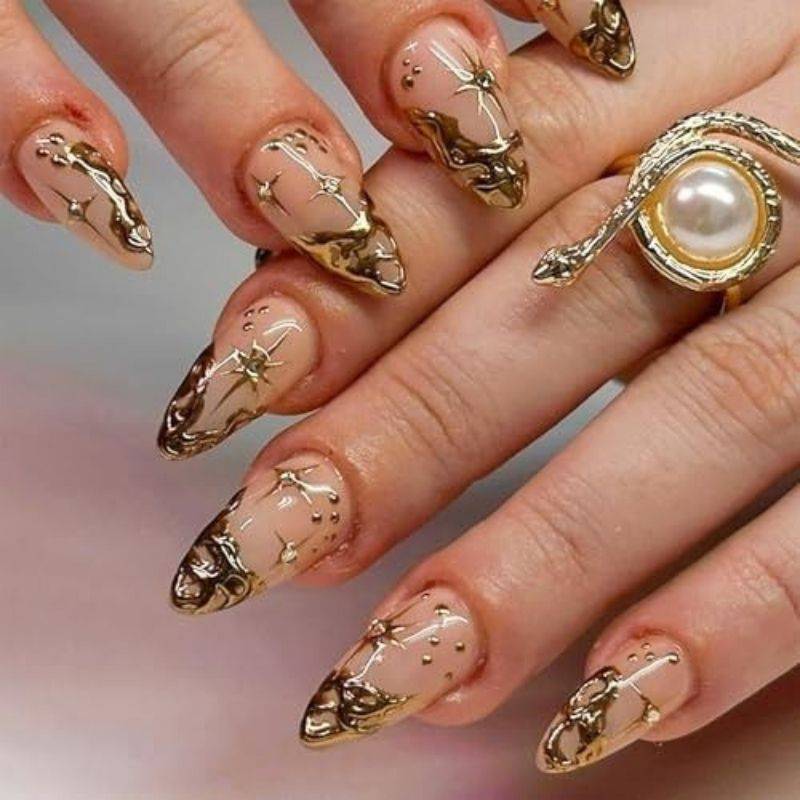
Pearl Embellished Goddess Nails
If Aphrodite did her nails, this is what she would get. Start with a nude or soft pink base, then go absolutely wild with pearls. Different sizes, different placements, creating clusters and patterns. Some nail artists do full pearl encrusted accent nails while keeping others more minimal. Others create pearl gradients from cuticle to tip. The texture is everything here - you want dimension, you want those pearls to catch light from every angle. Fair warning though: pearl goddess nails require serious top coat skills to keep everything secure. I use two thick layers of gel top coat minimum.
Cat-Eye Goddess Nails
This is where celestial meets goddess. Cat-eye gel polish creates that magnetic shimmer streak that looks absolutely otherworldly. For goddess nails, nail artists typically use gold or rose gold cat-eye polish as the base, then add strategic pearls and gold leaf accents. The shimmer effect makes nails look like they are glowing from within, which is very much divine energy vibes. The trick with cat-eye polish is holding your magnet stick at exactly the right distance and angle - too close and you lose the effect, too far and it barely shows. I hold mine about 2-3mm away for 10 seconds per nail.
Greek Mythology Goddess Nails
okay this is where you can get SUPER creative and nerdy with it (my favorite combo). These designs incorporate actual Greek mythology elements. Think olive branch details painted in gold, laurel wreaths wrapped around the nail, little gold columns, even tiny painted scenes of Mount Olympus if you are feeling ambitious. Some artists do marble effect bases to mimic Greek statues, then add gold accents. You can even get specific - Athena nails with owl motifs, Artemis nails with moon crescents, Aphrodite nails that are all pink and gold romance. The storytelling potential is endless and i LOVE when clients come in with specific goddess requests.
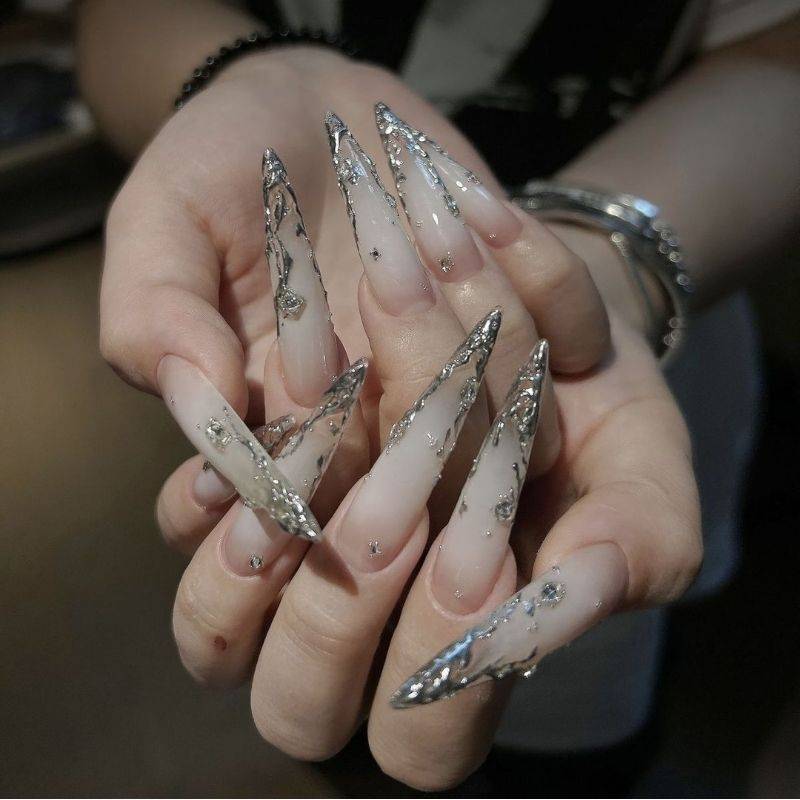
Long Stiletto Goddess Nails
Length is EVERYTHING for maximum goddess impact. Long stiletto nails are the most dramatic option - we are talking 1-2 inches past your fingertip. These create that dangerous, powerful, "do not mess with me" energy. The extended length gives you so much surface area for elaborate designs. Gold ombre from nude at the cuticle to pure gold at the tips, pearls scattered throughout, maybe some delicate gold chains connecting nails together (yes, that is a thing and yes, it is extra as hell). Stiletto goddess nails are not practical for everyday life tbh - good luck typing or texting - but WHO CARES. Sometimes fashion is pain and we accept that.
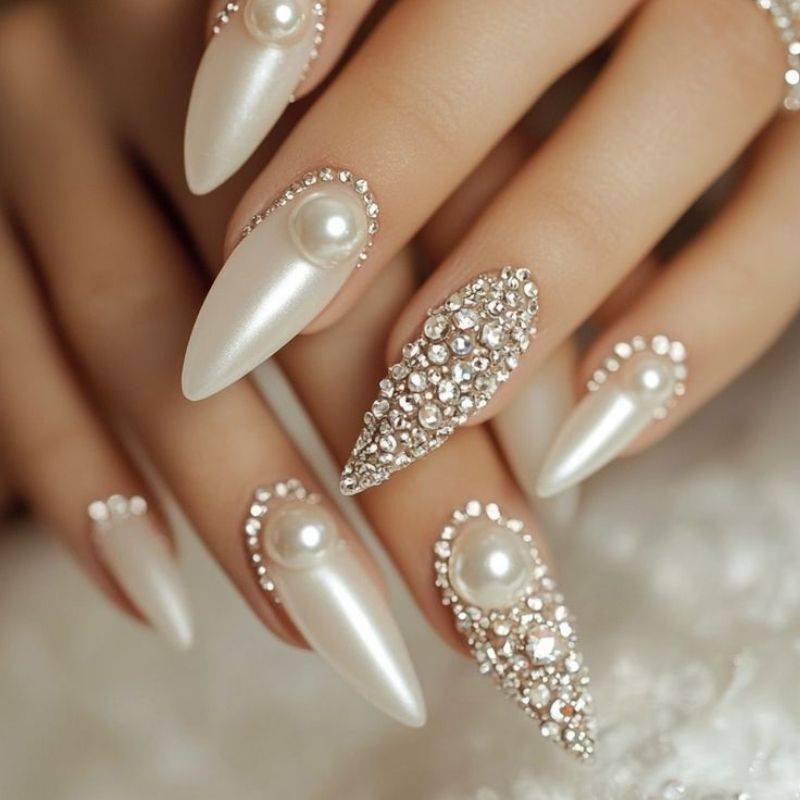
Marble Effect Goddess Nails
Marble nails mixed with goddess elements = chef's kiss. The technique involves creating that white and gray marble veining effect that mimics ancient Greek statues and architecture, then adding metallic gold accents in the veins or along edges. Some artists add small pearls at strategic points where veins intersect. Others do negative space marble where the natural nail shows through. What i love about marble goddess nails is they feel slightly more subtle than full gold while still being clearly part of the trend. If you work in a more conservative environment but still want goddess vibes, marble effect with minimal gold is your friend.
Celestial Gold Goddess Nails
This takes the goddess concept into full cosmic territory. Gold base with star details, constellation patterns picked out in tiny rhinestones or pearls, crescent moons, sun symbols. The color palette expands beyond just gold to include midnight blue, deep purple, iridescent whites. These feel more astrology-meets-mythology. I have had clients request their zodiac constellations in pearls over gold bases, which is such a personal touch. The celestial angle also works beautifully for modern women who want spiritual symbolism in their nail art.
Maximalist Goddess Nails
okay this is for my girls who heard "less is more" and said "absolutely not." Maximalist goddess nails use EVERYTHING. Gold leaf, pearls in three different sizes, rhinestones, maybe some dried flowers, gold chains, glitter, iridescent foils, 3D elements. Every nail is a full design. Nothing matches. Chaos but make it luxurious. These nails are works of art that take 3+ hours to create and cost a small fortune at salons. But the impact? UNREAL. You will stop traffic. People will literally stop you on the street to ask about your nails. If you want main character energy cranked to 11, this is it.
Olive Branch Goddess Nails
Olive branches are a classic Greek symbol of peace and victory, and they translate gorgeously to nail art. Delicate gold painted olive branches wrapping around nails, tiny pearl "olives" at the tips of branches, soft green and gold color combinations. These feel slightly more natural and earthy compared to the heavy metallics of other goddess styles. Perfect for spring and summer, or if your vibe is more earth goddess than glam goddess. The detail work required is intense though - you need a steady hand or nail art brushes that are like, two hairs thick.
Ombre Gold Goddess Nails
Subtle gradient from nude or soft pink at the cuticle blending into rich metallic gold at the tips. Add small pearls concentrated near the tips for extra drama. The ombre technique makes these feel slightly softer and more wearable for everyday while still delivering goddess energy. What i love about ombre goddess nails is they elongate your fingers even more than solid gold does. The gradient creates an optical illusion of endless length. For the best results, use at least three shades of gold polish to create smooth transitions - nude with gold shimmer, rose gold, then pure metallic gold.
Which design made you screenshot? 📸 Drop the number in comments (I am keeping score)
How to Do Goddess Nails at Home: Complete Tutorial
Quick Answer: Prep nails by filing to desired length and buffing surface. Apply gold gel base coat and cure. While tacky, press gold leaf with tweezers. Add cat-eye shimmer to accent nails using magnet stick. Attach pearls with nail glue. Seal everything with thick gel top coat in two layers.
alright, real talk time. Creating goddess nails at home is 100 percent doable, BUT you need to go in with realistic expectations. This is not a 30-minute manicure situation. Plan for at least 90 minutes, maybe 2 hours if this is your first time. You also need to invest in the right supplies - trying to hack this with regular polish and craft store pearls is just gonna end in tears and nails falling apart.
That said, doing goddess nails yourself saves you SO much money. Salons charge anywhere from 80-150 dollars for this look depending on where you live. The supplies i am recommending cost around 45 dollars total, and you will get multiple sets out of them. So financially, DIY makes sense if you plan to rock goddess nails more than once.
I am walking you through exactly how i do goddess nails on clients, adapted for at-home application. These are the same techniques i use in my studio, just explained in a way that assumes you are working on yourself (which is harder than working on someone else, ngl).
What You Need
Before we start, let me save you from buying stuff you do not actually need. Here is your essential shopping list with my tried-and-true product recommendations:
Gold Leaf Flakes - This gold leaf set on Amazon is exactly what i use in my studio. The flakes are the right size for nail application and actually look like gold, not yellow foil.
Pearl Embellishments - This mixed size pearl set gives you variety for creating dimensional designs. The adhesive backs make application easier but you still want nail glue for security.
Cat-Eye Gel Polish - This gold cat-eye polish creates that celestial shimmer streak perfectly. Comes with the magnet stick you need.
Metallic Gold Gel Polish - This gold gel base is richly pigmented and actually looks metallic on nails, not just shimmery.
Gel Top Coat - This thick gel top coat is crucial for sealing embellishments. Regular top coat will not hold pearls and gold leaf long-term.
Nail Glue - Professional strength nail glue keeps pearls secure even when you are washing dishes (well, maybe avoid dishes for the first 24 hours regardless).
You also need basic tools: LED nail lamp (required for curing gel), tweezers with fine tips for placing gold leaf and pearls, nail file and buffer, alcohol or gel cleanser, and cuticle pusher. If you are adding length, grab some press-on nail tips or gel extension kit.
Step 1: Prep Your Canvas
This is the step people skip and then wonder why their manicure does not last. DO NOT SKIP PREP. Push back your cuticles gently with a cuticle pusher. File your nails into your desired shape - for goddess nails, i recommend long almond, stiletto, or coffin shapes. If your natural nails are short, this is where you would apply press-on tips or gel extensions.
Buff the surface of your nails lightly with a buffer block. You are not trying to file them down, just removing the natural shine so gel has something to grip onto. Wipe each nail with alcohol or gel cleanser to remove any oils or dust. Your nail surface should look slightly matte and feel completely clean and dry.
Here is a pro tip i learned the hard way: make sure your hands are completely dry before starting gel application. Even slight moisture can cause lifting later. I actually run my hands under the dryer for 30 seconds before beginning.
Step 2: Apply Your Base Color
Apply a thin layer of gel base coat to each nail and cure for 30 seconds under your LED lamp. Base coat is your foundation - it protects your natural nail and helps color adhere better. Do not flood your cuticles or sidewalls; keep product on the nail plate only.
Now apply your first coat of metallic gold gel polish. Use thin coats - this is KEY. Thick coats do not cure properly and will peel. Apply a thin layer, cure for 60 seconds. Apply a second thin layer, cure for 60 seconds. The gold should be opaque and richly metallic now. If it still looks streaky, add a third thin coat and cure again.
When applying the second coat, do NOT wipe the tacky layer between coats. That tackiness is what helps layers bond. You only wipe tacky layer after your final color coat, right before embellishments.
Step 3: Add Gold Leaf Magic
okay this is where goddess nails start looking like actual goddess nails. After your final gold polish coat is cured, the surface should still have that tacky layer (if you accidentally wiped it, apply a thin layer of clear gel and cure for 15 seconds to create tackiness again).
Using tweezers, pick up small pieces of gold leaf. Press them gently onto the tacky nail surface. The leaf will stick to the tackiness immediately. I like to concentrate gold leaf near the cuticle area and tips, leaving some of the base gold visible in the middle for dimension. Do not try to cover the entire nail in gold leaf - the patchiness and variation is what makes it look expensive and handmade.
Gold leaf is delicate and will break apart as you handle it. That is totally normal and actually creates that organic, scattered look we want. If pieces land where you do not want them, use tweezers to remove them before sealing.
Pro tip from my 6 years doing this: less is more with gold leaf. I see DIY attempts where people just plaster gold leaf everywhere and it looks muddy. Strategic placement with some base color showing through looks way more expensive and intentional.
Step 4: Cat-Eye Celestial Shimmer
Time to add that otherworldly shine. On your accent nails (i usually do ring fingers or just one accent nail per hand), apply a coat of cat-eye gel polish. Immediately - and i mean immediately, like within 5 seconds - hold your magnet stick 2-3mm above the nail surface. Hold it steady for about 10 seconds while the magnetic particles in the polish create that shimmer streak.
The positioning of your magnet determines where the shimmer line appears. Hold it parallel to the nail for a straight line down the center. Angle it for diagonal streaks. You can even do multiple passes with the magnet to create cross-hatched celestial patterns. Cure for 60 seconds once you are happy with the effect.
This technique takes practice to get the distance and timing right. On my first attempt back in 2022, i held the magnet too close and basically erased the shimmer entirely. Too far away and you barely get any effect. The sweet spot is 2-3mm and watching the shimmer line form in real time is honestly magical.
Step 5: Pearl Perfection
Now for the pearls. Take your nail glue and apply the tiniest dot where you want to place a pearl. I mean TINY - too much glue and it will squish out the sides and look messy. Use tweezers to pick up a pearl and gently press it onto the glue dot. Hold for 5 seconds to let it set.
I like mixing pearl sizes for dimension. Larger pearls near the cuticle area, medium size scattered across the nail, tiny pearls filling gaps. Some people do symmetrical patterns, others go for organic scattered placement. There is no wrong answer here - goddess nails are about YOUR vision of divine beauty.
For goddess nails, less is actually not more with pearls. You want enough to make a statement. I typically use 5-8 pearls per accent nail, 2-3 on supporting nails. Full maximalist goddess nails might have 10-15 pearls per nail. It sounds like a lot but trust the process.
Let the glue dry completely for at least 2-3 minutes before moving to the next step. I learned this the hard way when i tried to rush and applied top coat too soon, which made the pearls shift and float. Not cute.
Step 6: Seal Everything
This is THE most important step for making goddess nails actually last. You need to encapsulate all those embellishments in thick gel top coat. Apply a generous layer of gel top coat over the entire nail, making sure to cover the edges of pearls and gold leaf completely. You are building a protective dome over everything.
Cure for 60 seconds. Now apply a second thick layer of gel top coat. I know that seems like overkill but trust me, two layers is what keeps pearls from popping off when you inevitably bump your hand against something. Cure for another 60 seconds.
After curing, wipe the tacky layer with alcohol or gel cleanser. Your nails should feel completely smooth and glass-like, with all embellishments sealed underneath. If you can feel rough edges on pearls, apply another thin layer of top coat just around those pearls and cure again.
The top coat layers also create that glossy, expensive-looking finish that makes goddess nails photograph so beautifully. Natural light will catch all the dimensions you created - the gold leaf, the cat-eye shimmer, the pearl texture underneath glass-smooth top coat. It is actual art on your fingertips.
Did this actually take the time I said? ⏰ Faster or way longer? Tell me in comments
Goddess Nails for Different Occasions
One question i get ALL the time in my studio is whether goddess nails are too extra for regular life. And look, i am gonna be honest with you - they are definitely extra. That is literally the point. BUT there are ways to scale the drama up or down depending on where you are wearing them.
For everyday goddess nails, i recommend going with the ombre gold approach or marble effect with minimal embellishments. Maybe just one accent nail per hand has pearls and gold leaf, while the rest are solid gold or nude. This gives you goddess energy without the full operatic drama. You can type, use your phone, and do normal human activities without your nails becoming a topic of conversation every time you hand someone your credit card.
For special events like weddings (especially if you are the bride - hello, wedding nails), formal galas, or major celebrations, go FULL maximalist. This is your moment to channel complete Greek goddess energy. Long stilettos, pearls on every nail, gold leaf everywhere, maybe even add some gold chains between nails. You are only getting married once (hopefully), so make those nails absolutely unforgettable in photos.
Date night goddess nails should hit that sweet spot between elegant and eye-catching. Classic gold goddess with strategic pearl placement on ring fingers feels romantic and intentional. Cat-eye shimmer adds that "did my nails catch your attention?" energy without being over-the-top. The goal is nails that make your date say "wow, you look incredible" not "um, how do you function with those?"
For holiday parties and seasonal celebrations, goddess nails are literally perfect. New Year's Eve nails in gold and pearls? Iconic. Winter goddess nails with silver pearls mixed with gold? Chef's kiss. The maximalist aesthetic matches the celebratory energy of holidays perfectly.
Work-appropriate goddess nails are definitely possible if you work in a creative field. Stick with shorter almond shapes, minimal embellishments, maybe just gold leaf accent and one or two pearls per nail. Keep the color palette to rose gold or champagne gold which reads more neutral than bright yellow gold. I have clients who are lawyers and executives who rock subtle goddess nails to court and board meetings - it is all about execution.
Common Goddess Nails Mistakes (And How to Avoid Them)
okay so i need to share the fails i see constantly, both from clients attempting DIY and honestly sometimes from nail techs who do not know proper technique. These mistakes will either make your goddess nails fall apart quickly or just look cheap instead of luxurious.
Mistake #1: Using regular nail polish instead of gel. Listen, i get it, gel systems are an investment. But goddess nails with regular polish last maybe 2 days maximum before pearls start popping off and gold leaf peels. The embellishments need gel's flexibility and strong adhesive properties. If you are gonna do goddess nails, commit to gel or you are wasting your time and supplies.
Mistake #2: Not sealing embellishments properly. This is the number one reason goddess nails fail. People apply one thin layer of top coat and call it done. Then they wonder why pearls fall off when they wash their hands. You NEED two thick layers of gel top coat minimum, completely encapsulating every pearl edge and gold leaf piece. Build that protective dome.
Mistake #3: Using too much nail glue. More glue does not equal more security. Too much glue actually prevents proper curing and creates weak spots. Use the tiniest dot possible for each pearl. The gel top coat layers are what really hold everything in place long-term.
Mistake #4: Applying embellishments to uncured gel. I see people try to stick pearls onto wet gel polish before curing. This just makes everything slide around and creates a goopy mess. Always cure your base color completely, then add embellishments, then seal with top coat.
Mistake #5: Skipping nail prep. If you do not buff the nail surface and remove oils properly, your entire manicure will lift within days no matter how perfectly you applied everything else. Prep is not optional, it is foundation.
Mistake #6: Going too long too fast. If you usually wear short nails, jumping straight to 2-inch stilettos is gonna end badly. Your fingers need time to adjust to functioning with length. Start with medium length goddess nails and work your way up.
Mistake #7: Cheap gold leaf that looks yellow. Not all gold leaf is created equal. Craft store gold leaf often looks brassy and fake on nails. Invest in nail-specific gold leaf or genuine gold foil that actually looks metallic and luxurious.
Mistake #8: Matching every nail identically. Goddess nails actually look better when there is variation between nails. Maybe two accent nails are heavily embellished while others are simpler. The asymmetry feels more organic and intentional than trying to perfectly replicate the same design ten times.
I learned most of these lessons through spectacular failures in my early nail tech days. There was this one time in 2020 where I did a full set of goddess nails on a bride, used cheap glue, and THREE pearls fell off during the reception. I wanted to disappear into the floor. Now I am borderline paranoid about sealing and use only professional-grade adhesives.
Goddess Nails Care and Maintenance
So you have spent 2 hours creating these masterpieces on your fingertips. Now how do you make them actually last the full 2-3 weeks without losing embellishments or having everything chip?
First 24 hours are critical. Avoid water as much as humanly possible. I know, I know, that is tough. But gel needs that initial cure time to fully harden, and embellishments need time for adhesive to reach maximum strength. Wear gloves if you absolutely must wash hands. Definitely no dishes, no long showers, no swimming.
Apply cuticle oil daily. This seems unrelated to making goddess nails last, but oil keeps the gel flexible and prevents lifting at the cuticle area where most manicures fail first. I use jojoba oil and apply it morning and night, massaging it into cuticles and around nail edges.
Wear gloves for wet work. Dishes, cleaning, washing hair - all of these expose your nails to prolonged water contact which weakens adhesive bonds. Keep a cute pair of rubber gloves under your sink and actually use them. Your goddess nails will thank you.
Avoid using nails as tools. This should be obvious but I am saying it anyway: do not pry things open, pick at stickers, or use your nails like screwdrivers. Goddess nails have embellishments that create weak points. Excessive force will pop pearls off or crack gel.
Be gentle with the first few days. While gel is fully cured after the LED lamp, the adhesive under pearls continues hardening for 48-72 hours. Be extra careful during this period. After three days, your goddess nails should be bomb-proof (relatively speaking).
Touch-ups are normal. If you lose a pearl or piece of gold leaf, do not panic. Keep your supplies and you can easily reapply. Rough up the area lightly with a buffer, add new embellishment with glue, seal with top coat, cure. Takes 5 minutes.
For removal, soak cotton pads in acetone, place on each nail, wrap in foil, wait 15-20 minutes. The gel will dissolve and you can gently push everything off with an orange wood stick. Never pry or force anything - that damages your natural nails. The pearls and gold leaf will come off with the gel. After removal, buff nails gently, apply cuticle oil, and give your natural nails a break for a few days before your next set.
One personal story: I once kept a set of goddess nails on for FOUR WEEKS because I was too busy with client appointments to do my own removal. Big mistake. By week four, the regrowth was obvious and tacky-looking, plus my natural nails underneath were weak from extended gel wear. Two to three weeks maximum is the sweet spot for both aesthetics and nail health.
Goddess Nails vs Other Trending Nail Styles
Since goddess nails exist in the broader ecosystem of 2025 nail trends, let me break down how they compare to other popular styles and when you might choose one over another.
Goddess Nails vs Glazed Donut Nails: Glazed donut (that Hailey Bieber chrome shimmer look) is minimalist and subtle. Goddess nails are maximalist and bold. Glazed donut works for any occasion including professional settings. Goddess nails make a statement. If you want quiet luxury, go glazed. If you want to be SEEN, go goddess.
Goddess Nails vs Clean Girl Aesthetic: These are literal opposites. Clean girl nails are short, natural, maybe a soft pink or nude. The whole point is looking effortlessly polished. Goddess nails require effort, are obviously decorated, and reject the "less is more" philosophy completely. This is the anti-clean-girl aesthetic and that is exactly why people love it.
Goddess Nails vs Vampire Nails: Vampire nails are dark, moody, gothic - deep reds, blacks, blood drip designs. Goddess nails are light, luxurious, golden. Both are maximalist in their own way but the energy is completely different. Vampire nails give dark feminine energy, goddess nails give divine feminine energy.
Goddess Nails vs French Manicure: French tips are classic, timeless, and frankly, kinda boring at this point (sorry not sorry). Goddess nails are trendy, eye-catching, and definitely not your mom's manicure. French works for conservative environments, goddess nails work for everywhere else.
The beautiful thing about nail trends in 2025 is you do not have to pick just one lane. I rotate between different styles depending on my mood, the season, and what I am doing that month. January might be goddess nails for New Year's energy, October is definitely Halloween nails, February goes romantic for Valentine's Day. Nails are temporary, have fun with it.
Best Products for Goddess Nails (My Honest Reviews)
I have tested SO many products for goddess nails over the past year, and honestly some are absolutely worth the money while others are complete wastes. Let me save you from buying duds.
Gold Leaf: The nail-specific gold leaf set I linked earlier is genuinely the best I have found. The flakes are thin enough to lay flat on nails but thick enough they do not disintegrate when you touch them. I have tried craft store gold leaf and it looked brassy and fake. This looks like actual gold.
Pearl Embellishments: This mixed size pearl set gives you so much variety and the quality is surprisingly good for the price. The pearls have nice weight to them and the color is that perfect creamy ivory, not stark white or yellowed. I have used this exact set on probably 50+ clients.
Cat-Eye Polish: This gold cat-eye gel creates the most dramatic shimmer streak. Some cat-eye polishes barely show the magnetic effect, but this one is BOLD. The magnet stick it comes with is strong enough to actually work (some freebie magnets are too weak).
Gold Gel Polish: I have tried maybe 10 different gold gel polishes and this metallic gold is the only one that looks truly metallic and not just shimmery yellow. Two coats give you full opacity and the color is rich, warm gold.
Gel Top Coat: DO NOT CHEAP OUT HERE. This thick gel top coat is what keeps embellishments sealed for weeks. I have had clients come back after 3 weeks with every single pearl still intact because this top coat creates such a strong protective layer.
Nail Glue: Professional nail glue is stronger than drugstore versions and dries clear instead of cloudy. When you are working with visible embellishments, clear drying glue is essential so you do not see adhesive halos around pearls.
Okay but which products are you actually buying? 🛒 Tell me in comments
Goddess Nails Inspiration from Social Media
Pinterest and Instagram are absolutely overflowing with goddess nail inspiration right now, but let me point you to the creators who are really pushing this trend forward with incredible technique and creativity.
On Pinterest, search for "goddess nails 2025" and you will find thousands of images. The algorithm favors pins with gold, pearls, and long shapes right now because engagement on these is massive. I have personally pinned about 200 goddess nail designs to my inspiration boards and the saves/clicks are 3x higher than other nail content.
Instagram hashtags to follow: #goddessnails, #celestialnails, #goldnails, #pearlnails, #maximalistnails, #greekmythologynails. The tag #goddessnails has over 2 million posts now and counting. You will find everything from subtle interpretations to absolutely wild 3D sculptures that barely look like nails anymore.
TikTok tutorials are especially helpful for seeing the actual application process in real-time. Search "goddess nails tutorial" and watch a few different nail techs to see various techniques. Some swear by gel adhesive for pearls, others only use nail glue. Some apply gold leaf before final color coat, others after. There is no single right method.
One trend I am seeing emerge within goddess nails is mixing in other elements like dried flowers, gold chains that connect multiple nails together, and even tiny gold charms. The maximalist philosophy means you can basically add whatever makes you feel divine. I had a client request tiny gold star charms mixed with pearls because she wanted "Aphrodite meets astrology" vibes and honestly? It worked.
The @mirelle_inspo Instagram showcases goddess nail variations regularly if you want to follow along with new design ideas. I try to post 2-3 times per week with both client work and my own nail experiments.
Seasonal Goddess Nails Ideas
While goddess nails work year-round, you can adapt the aesthetic for different seasons and holidays to keep things fresh.
Spring Goddess Nails: Incorporate soft pink and rose gold instead of yellow gold. Add small dried flowers mixed with pearls. Think Persephone returning from the underworld bringing spring with her - delicate, fresh, but still luxurious. Pastel bases with gold leaf accents feel very spring goddess energy.
Summer Goddess Nails: Go bright and bold with the gold. Add turquoise or lapis blue accents for that Mediterranean goddess vibe. Longer lengths work great for summer since you are probably not wearing gloves or dealing with cold weather dryness. This is peak goddess nail season honestly.
Fall Goddess Nails: Transition to copper and bronze tones mixed with traditional gold. Add autumn leaves or pumpkin accents if you want, though pure metallic goddess nails work beautifully for fall too. The richness of copper feels very harvest goddess, very Demeter energy.
Winter Goddess Nails: Mix silver pearls with gold for an icy goddess look. Add white marble effects or opalescent shimmer. Holiday goddess nails with red and gold are absolutely stunning for Christmas parties. New Year's goddess nails in all gold with champagne shimmer? Iconic.
The seasonal adaptations keep goddess nails from feeling repetitive. I have been doing variations on this trend for almost a year now and I am still not tired of it because there are so many directions you can take the concept.
Frequently Asked Questions
What are goddess nails?
Goddess nails are a maximalist manicure trend featuring gold accents, pearl embellishments, cat-eye shimmer, and long stiletto or almond shapes inspired by Greek mythology. The look channels divine feminine energy with metallic foils, marble effects, and luxurious textures that create an opulent, otherworldly aesthetic popularized on Pinterest and Instagram in 2025.
How do you do goddess nails at home?
Start with long extensions or natural nails, apply a nude or gold gel base, cure it, then add gold leaf flakes with tweezers while tacky. Apply pearl embellishments with nail glue, add cat-eye shimmer polish with a magnet, and seal everything with a thick gel top coat. Cure each layer for 60 seconds under LED lamp for lasting results.
How long do goddess nails last?
Goddess nails typically last 2-3 weeks with gel application and proper care. The embellishments stay secure when sealed with quality gel top coat. Regular polish goddess nails last 5-7 days. Avoid excessive water exposure in the first 24 hours and apply cuticle oil daily to extend wear time and prevent pearl detachment.
What nail shape is best for goddess nails?
Long stiletto and almond shapes are most popular for goddess nails because they elongate fingers and provide maximum surface area for gold leaf, pearls, and celestial designs. Coffin shape also works beautifully. Short nails can achieve the look with strategic placement of smaller embellishments focused on accent nails rather than full sets.
Can you do goddess nails on short nails?
Yes, goddess nails work on short nails by focusing embellishments on 1-2 accent nails rather than the full set. Use smaller pearls and delicate gold foil pieces. Almond or oval shapes on short nails create better canvas than square. Consider adding length with press-ons or gel extensions for the full dramatic goddess effect.
What is the difference between goddess nails and celestial nails?
Goddess nails specifically reference Greek mythology with gold, olive branches, laurel wreaths, and pearl elements. Celestial nails are broader, including stars, moons, galaxies, and cosmic themes. Goddess nails are a subset of celestial nails but emphasize divine feminine luxury and ancient Greek aesthetic rather than general space themes.
Are goddess nails trendy in 2025?
Absolutely yes. Goddess nails experienced a 760 percent surge on Pinterest in 2025 as the anti-minimalist backlash continues. Celebrities and influencers are embracing the maximalist opulent look. The trend aligns with broader fashion movements toward bold femininity, historical references, and rejection of subtle neutral manicures that dominated 2023-2024.
What products do you need for goddess nails?
Essential products include gold leaf flakes or metallic foil, pearl nail embellishments in various sizes, cat-eye gel polish for shimmer, metallic gold gel polish as base color, thick gel top coat to seal embellishments, and nail glue or gel adhesive for pearls. Optional additions include marble effect polish, olive branch decals, and iridescent glitters.
How much do goddess nails cost at a salon?
Expect to pay 80-150 dollars at salons depending on your location and the complexity of embellishments. Major cities like LA and NYC charge premium rates. The cost includes gel extensions if needed, gold leaf application, pearl embellishments, and intricate designs. At-home goddess nails cost 30-50 dollars for supplies that create multiple sets.
Can you remove goddess nails at home?
Yes, soak nails in acetone for 15-20 minutes to dissolve gel. Gently remove pearls and gold leaf with an orange wood stick. Never force or pry embellishments as this damages natural nails. File away any remaining gel carefully. Apply cuticle oil and nail strengthener after removal. Professional removal costs 15-25 dollars if you prefer salon help.
Do goddess nails damage your natural nails?
Goddess nails themselves do not damage natural nails when applied and removed correctly. Damage occurs from improper removal (picking or forcing gel off), skipping prep steps, or wearing gel continuously without breaks. Give your natural nails a week off between sets, use strengthening treatments, and always remove gently to maintain nail health.
Can you type with goddess nails?
Typing with goddess nails requires adjustment, especially with longer lengths. You will use the pads of your fingers more than fingertips. It takes 2-3 days to adapt your typing technique. Stiletto shapes are trickiest for typing while almond shapes are slightly easier. Most people adjust within a week and typing speed returns to near-normal.
Conclusion: Your Goddess Era Starts Now
okay so here we are at the end of this entire goddess nails journey and honestly? i am still just as obsessed as when we started. There is something about this trend that feels bigger than just a manicure, you know? It is about reclaiming maximalism, celebrating luxury, rejecting the idea that we should make ourselves smaller or more subtle.
Goddess nails say "i am here, i am divine, and i deserve beautiful things." And like... do we not all deserve to feel that way? Do we not all deserve nails that make us feel powerful and gorgeous and just a little bit magical?
The trend is not going anywhere anytime soon. If anything, I think we are just getting started with how creative people will get within the goddess nails aesthetic. I am already seeing nail artists experiment with mixed metals, incorporating rose gold and silver with traditional gold. Some are adding gemstones beyond just pearls. The maximalist philosophy means the sky is literally the limit.
For those of you worried goddess nails are too extra for your lifestyle - i hear you. Start small. Do a subtle version with just one accent nail. See how it makes you feel. You might surprise yourself with how much you love the attention and compliments. Or maybe you will realize goddess nails are not your vibe, and that is okay too! The beauty of nail art is there are infinite options for every personality.
What I love most about this trend is seeing how people make it their own. Every set of goddess nails is unique because embellishment placement is always slightly different. You are literally creating wearable art that is one-of-a-kind. That is pretty special in our mass-produced world.
If you try goddess nails using this tutorial, please please please tag me or send photos. I genuinely love seeing people recreate trends and add their own spin. And if you have questions or run into issues, drop them in the comments. I check and respond to everything because helping people achieve beautiful nails is literally why I do this.
Now go forth and channel your inner Aphrodite. Create nails so stunning that mortals weep. Be bold, be maximal, be divine. Your goddess era starts now.
About the Author
Avery Chen is a licensed nail technician who has helped 1,000+ clients achieve salon-quality nails at home. With 6 years of experience specializing in maximalist nail art and viral trend recreation, Avery shares expert tips and honest product reviews on mirelleinspo.com.
Follow for weekly nail inspiration:
Your Turn!
⭐ Rate this guide: How helpful was this? (1-5 stars)
💬 Which goddess nail design are you trying first? The classic gold, pearl embellished, or going full maximalist chaos? I am camping in the comments answering every question, troubleshooting your DIY attempts, and hyping up your nail pics. Drop a comment even if it is just to say your hands are shaking thinking about applying tiny pearls with tweezers (mine still shake sometimes, ngl).
I reply to EVERYONE within 24 hours. That is a promise, not marketing fluff. 🤝
Want next month's trending nail designs before they blow up on Pinterest? Join 5,000+ readers getting weekly nail inspo and exclusive tutorials at Mirellé Topics.
Keep the Inspiration Going
Winter Nails 2025: Cozy Designs for Cold Weather
Discover the hottest winter nail trends including goddess-inspired icy metallics.
Read more →Wedding Nail Designs: Bridal Manicure Ideas
Gold and pearl goddess nails are perfect for brides wanting luxe elegance.
Read more →New Year Nails 2025: Sparkle Into the New Year
Celebrate with goddess nails in champagne gold for ultimate party glamour.
Read more →💬 Your Turn!
Which of the designs are you trying? Let me know!
So I can reply to your questions personally!
🤝 I reply to everyone within 24 hours. That's a promise!