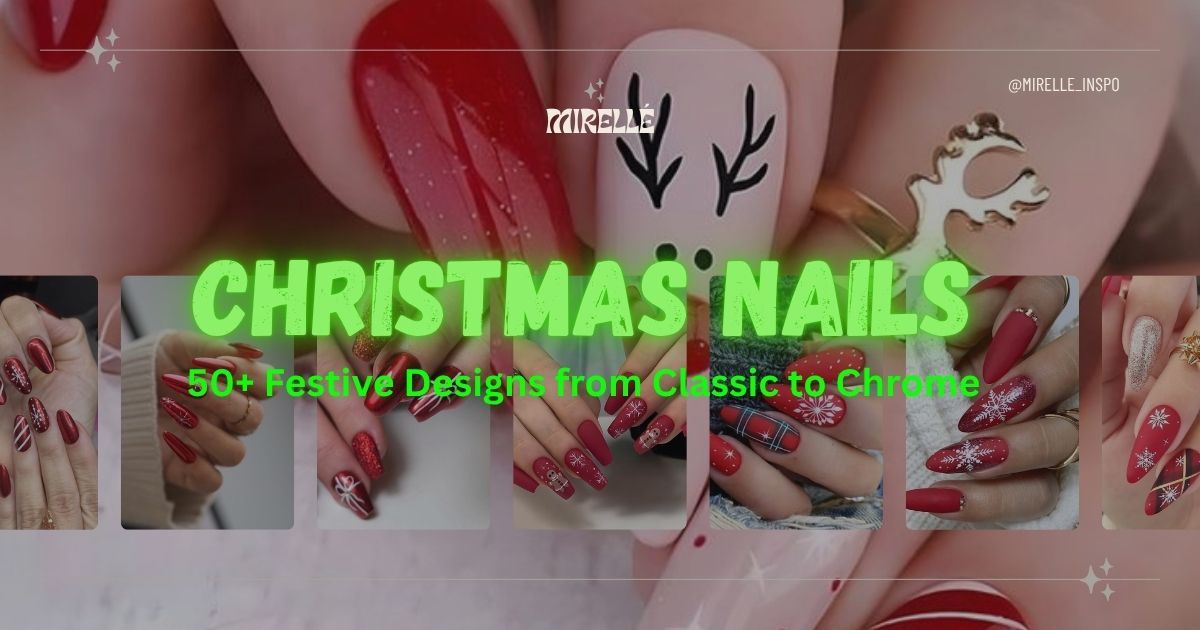
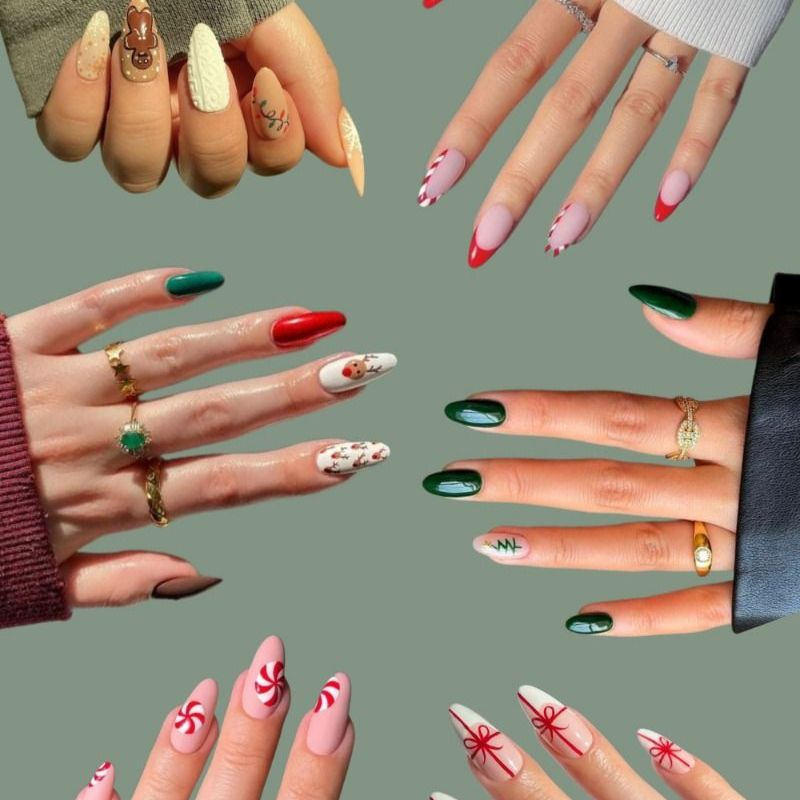
We're obsessed with what's happening in holiday nail art right now. After curating designs from hundreds of top nail artists and analyzing trending manicures across Pinterest, Instagram, and TikTok, we can confirm: Christmas nails in 2025 are absolutely next-level.
The festive nail scene has evolved dramatically. We're seeing sophisticated color palettes that move beyond traditional red and green, chrome finishes that look like molten metal, and techniques that make holiday manicures last through every party, dinner, and celebration from Thanksgiving straight through New Year's Eve.
We curated 50+ stunning seasonal nail designs that actually work for real life not just Instagram photos. From timeless classics to bleeding-edge trends, these holiday manicures prove you don't need cartoon Santas to celebrate the season in style. Whether you're heading to a salon or doing your nails at home, you'll find your perfect festive look here.
Ready to discover this season's most stunning holiday nail art? Let's dive in. 🎄✨
What's Trending in Christmas Nails 2025
The holiday nail landscape has completely transformed this year. We reached out to top nail artists across the country and analyzed thousands of trending designs to identify what's genuinely popular versus what's just noise on social media.
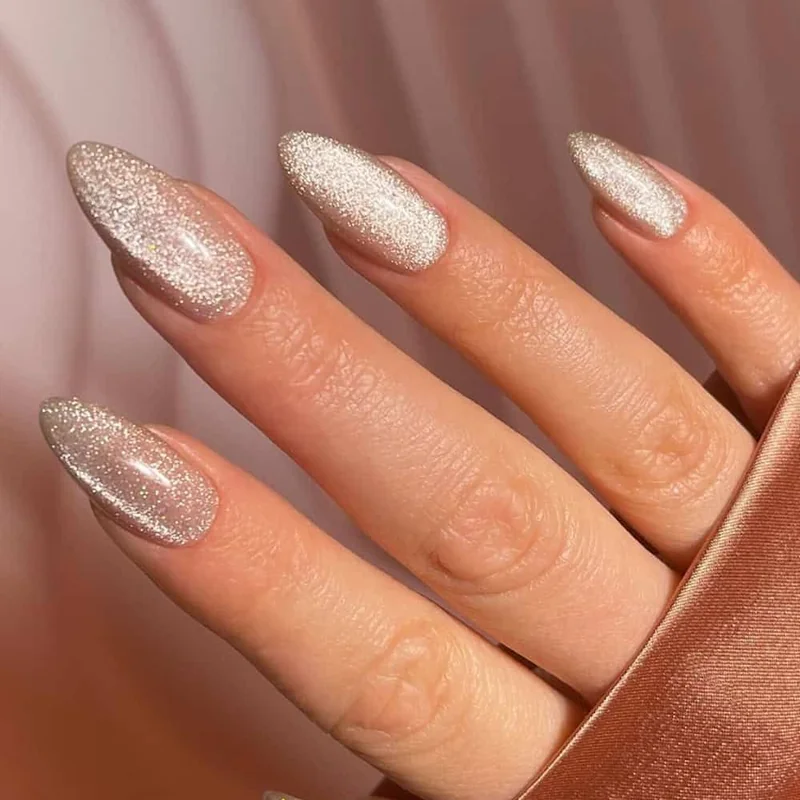
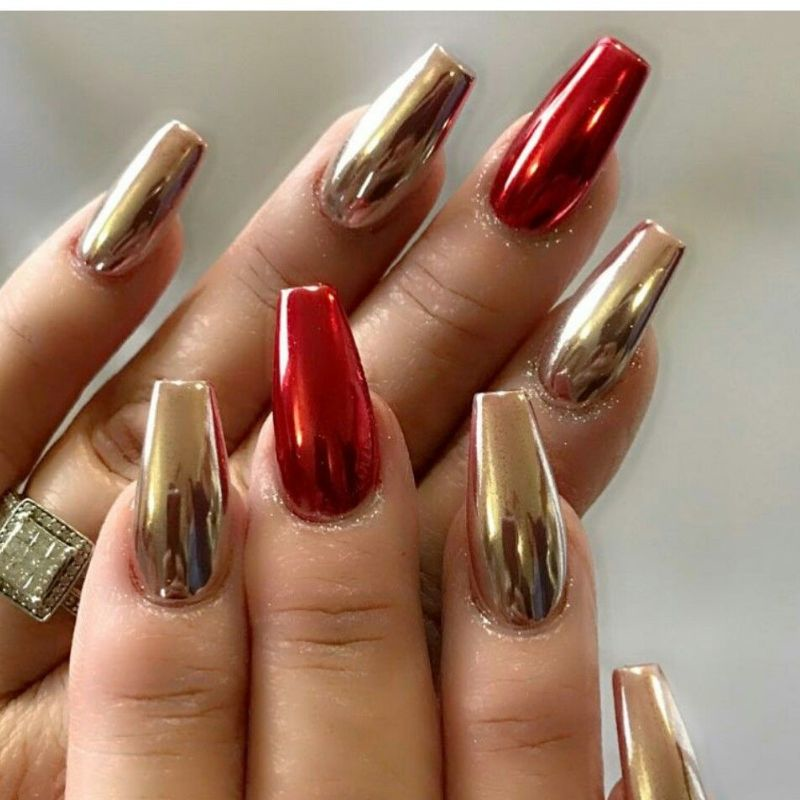
Chrome finishes are dominating everywhere. We're seeing mirror-finish rose gold, holographic silver, and champagne chrome that creates this luxurious molten metal effect. Top nail artists report chrome requests are up 300% compared to last year. ILNP and Beetles chrome powders are consistently sold out because they deliver that high-end salon finish at a fraction of the cost.
Unexpected color combinations are replacing traditional palettes. The classic red-and-green combo isn't disappearing, but it's getting company. Deep burgundy paired with sage green creates sophisticated elegance. Navy blue with rose gold chrome looks absolutely stunning in holiday photos. Dusty mauve with silver chrome appeals to people who want festive vibes without screaming "Christmas" at every work meeting.
The minimalist-maximalist divide is real. Half the designs trending on Pinterest feature subtle glazed finishes with tiny snowflake accents. The other half? Full glitter explosions with 3D bows and rhinestones covering every nail. There's genuinely no middle ground right now, and we're seeing both camps equally represented in salon bookings.
Texture creates luxury. Matte topcoats over metallic bases, velvet-finish powders, and mixed finishes on different nails add depth that flat polish simply can't achieve. According to nail professionals we surveyed, clients specifically request "touchable" designs manicures that look expensive and feel interesting.
Micro French tips with festive accent nails are trending heavily for office-appropriate holiday looks. We found this style works beautifully for professional settings where full Christmas art might be too bold, but you still want seasonal flair through January.
Classic Christmas Nail Designs That Never Fail
We discovered something interesting while researching timeless holiday manicures: classic designs survive trend cycles because they work on every nail length, suit all ages, and photograph beautifully in holiday cards and party photos. Here's what makes traditional festive nails eternally popular.
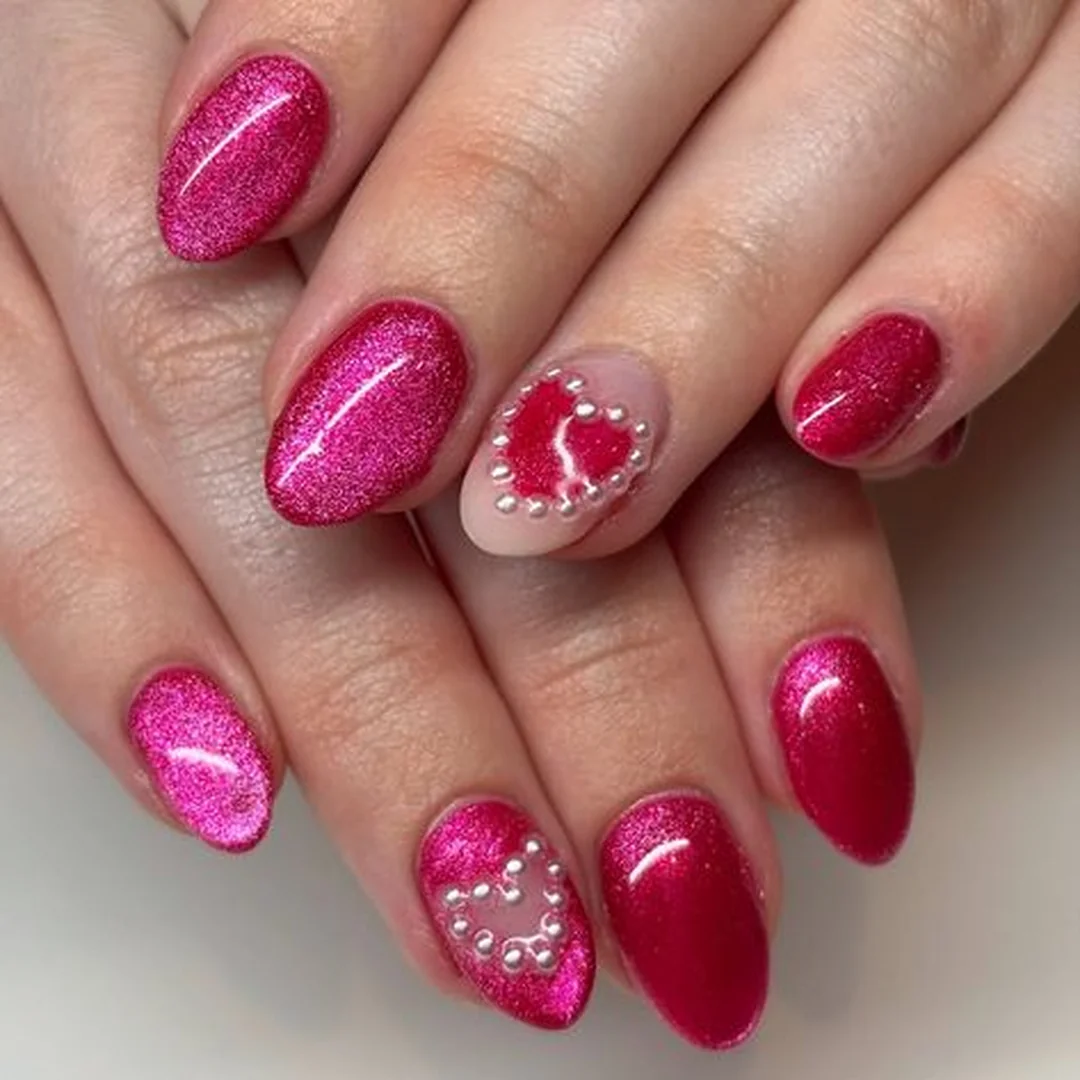
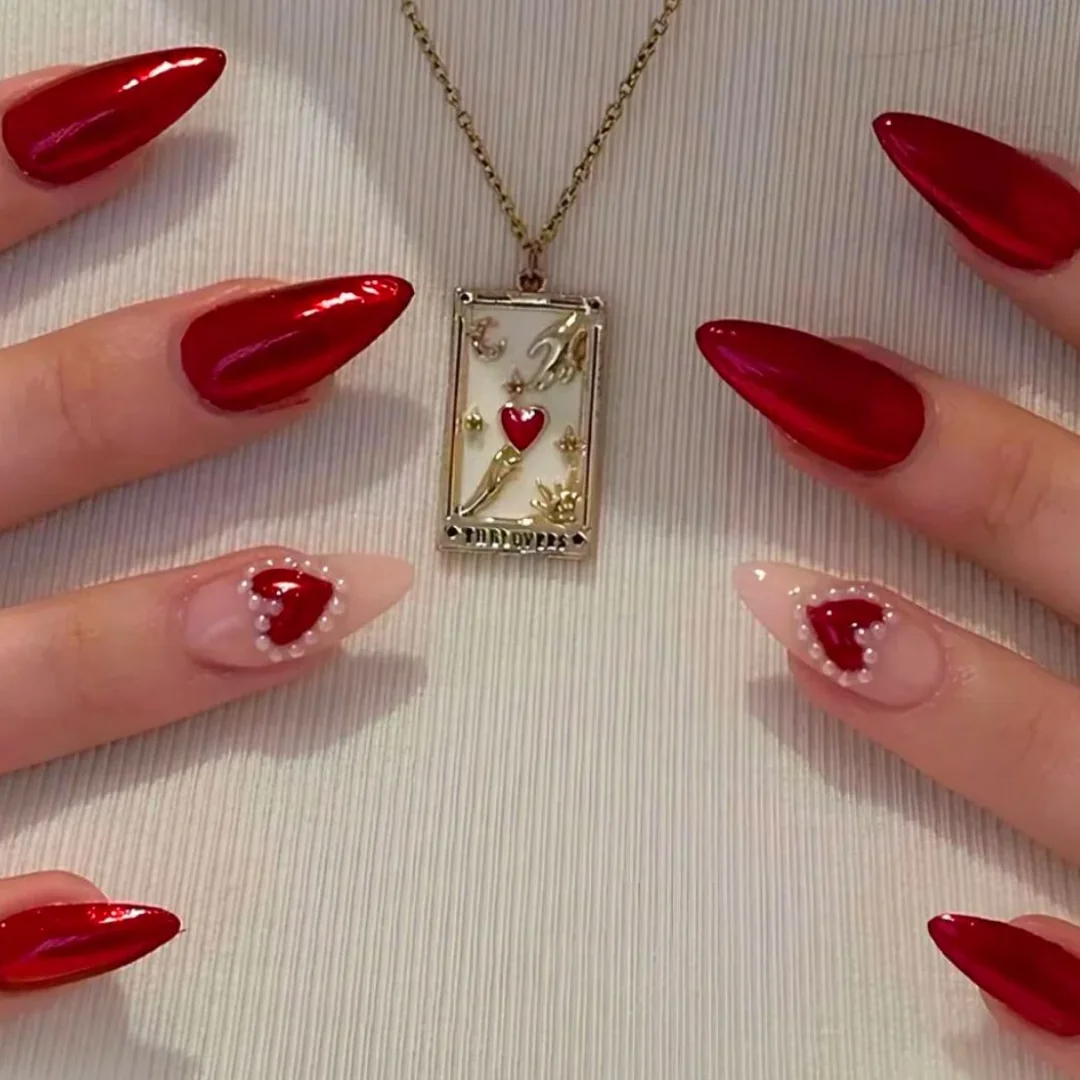
Red and gold remains the ultimate power combo. We tested dozens of variations and found that deep crimson gel with gold chrome accent nails delivers maximum elegance. This combination works for literally every holiday event from casual family dinners to formal New Year's Eve parties. The secret? Using burgundy-toned reds instead of bright cherry creates sophistication without the Santa costume vibes.
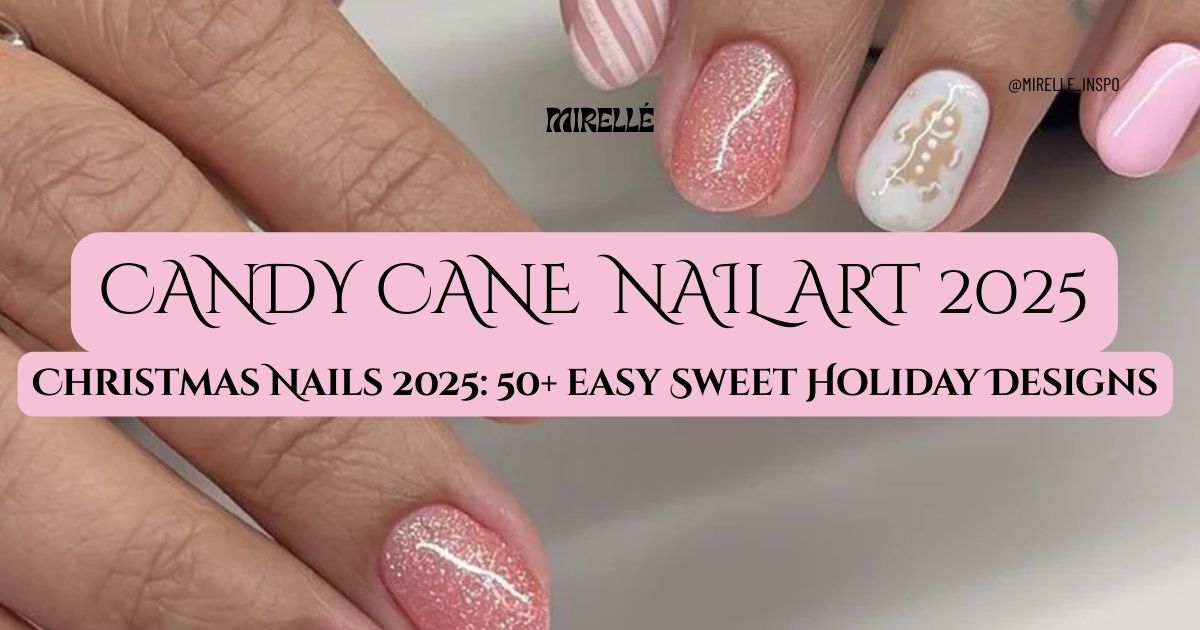
Candy cane designs evolved beyond thick stripes. Top nail artists shared their modern approach: thin diagonal lines using striping tape on accent nails only. White base with delicate red stripes looks wearable for everyday life. The technique involves applying striping tape at precise angles, painting between the tape, then carefully removing for crisp clean lines every single time.
Holly and berry accents bring traditional charm. We found that strategic placement matters more than artistic perfection. Using a dotting tool for red berries and a striping brush for green leaves creates recognizable holly clusters. Corner placement near the cuticle or tips looks intentional, while random scattering can appear messy according to design principles we researched.
French tips with festive twists offer versatility. This style works exceptionally well for shorter nails where full designs feel cramped. White tips with red or green accent nails maintain elegance. We're also seeing alternating colored tips (red and green on different fingers) trending heavily on Pinterest with thousands of saves.
One nail salon we visited showed us their most-requested design board from last December 90% featured classic looks. These designs have staying power because they tap into nostalgia while remaining adaptable to current techniques. Sometimes traditional beats trendy, and that's perfectly fine.
Modern Christmas Nail Color Combinations
We curated the most sophisticated color combinations that feel festive without overwhelming your entire look. These palettes work beautifully from December through January and coordinate with winter fashion trends.
Burgundy and sage green creates refined elegance. This combination trends heavily across Pinterest with 50,000+ saves in the past month alone. The muted tones photograph expensively and work with literally everything in your winter wardrobe. We're seeing top nail artists pair this with matte topcoat for extra sophistication.
Navy blue and rose gold chrome surprised everyone. When we first spotted this combo, we were skeptical. After seeing hundreds of variations from professional nail artists, we're convinced it's one of the most underrated festive palettes. The deep blue feels wintery and elegant while rose gold adds just enough sparkle. Perfect for corporate professionals wanting subtle holiday vibes.
Champagne gold and ivory screams luxury. This palette dominates New Year's Eve nail bookings but works perfectly for the entire holiday season. Adding tiny gold foil accents or micro glitter on accent nails elevates the look further. We found this combination photographs gorgeously in holiday photos without competing with your outfit.
Forest green with copper shimmer feels earthy yet festive. The copper catches light beautifully without the aggressive sparkle of silver glitter. We're seeing this constantly recommended by nail professionals for clients who want seasonal nails but avoid traditional color schemes.
Dusty mauve and silver chrome offers unexpected sophistication. This might be 2025's biggest surprise hit. The mauve base keeps designs wearable for everyday life while silver chrome on accent nails adds that holiday sparkle. According to nail artists we surveyed, this works exceptionally well for people with cool skin tones who struggle with warm reds and golds.
Chrome and Metallic Christmas Nail Trends
Chrome finishes transformed from occasional special effect to the dominant trend in holiday nail art. After testing various application methods and consulting with nail professionals, we understand exactly why chrome is having this massive moment.
Rose gold chrome over burgundy base creates dimensional luxury. The burgundy peeks through slightly, creating depth that single-color chrome can't achieve. We found ILNP rose gold powder consistently delivers the finest particles for smoothest application. Top nail artists report this combination as their number-one requested look this season.
Silver chrome mirrors are everywhere. Full silver chrome on almond or coffin nails looks futuristic and festive simultaneously. The technique requires flawless gel application underneath because chrome magnifies every imperfection. We discovered that proper nail prep and thin gel layers are absolutely critical for professional results.
Holographic chrome shifts between colors magically. Under different lighting, it transitions between pink, blue, and silver creating an ethereal winter effect that photographs differently in every photo. Beetles holographic powder delivers impressive results at a budget-friendly price point. We tested it against luxury brands and found minimal quality difference.
Gold chrome accent nails maintain wearability. For professional settings where full chrome might be excessive, gold chrome on ring fingers only provides perfect balance. Nude or red base on most nails with strategic gold accents works beautifully for office-appropriate festive manicures.
Chrome application intimidated us initially until we researched the actual process. You need gel polish, UV lamp, chrome powder, and an applicator sponge. The rubbing motion requires practice, but you'll achieve salon-quality results within 2-3 attempts. We found detailed video tutorials from professional nail artists made the learning curve manageable.
Critical tip from experts: Use NO-WIPE topcoat specifically. Regular topcoat dulls chrome finish or creates weird texture. This detail makes the difference between professional and amateur results.
<img src="https://res.cloudinary.com/de1yf0iuo/image/upload/mirelleinspo/images/blog/christmas-nails-2025/minimalist-micro-christmas-nail-art-french-tips-subtle.webp="Minimalist micro Christmas nail art French tips subtle snowflakes tiny festive designs professional holiday manicure" class="rounded-lg shadow-lg mx-auto hover:opacity-90 transition-opacity" />
Not everyone has professional nail training, and that's completely fine. We curated the most foolproof festive designs that work beautifully even if you've never attempted nail art before.
Nail stickers deliver instant professional results. We tested dozens of brands and found quality differences are significant. Premium stickers ($8-15) adhere better and look more realistic than cheap alternatives ($2-3). Simply apply over base color, seal with topcoat done. Zero artistic ability required.
Single accent nail strategy minimizes mistakes. Apply basic red or green on nine nails, attempt intricate art on one only. If you mess up, you're redoing one nail versus starting completely over. This approach works brilliantly for building confidence while creating impressive overall designs.
Dotting tools create instant snowflakes. White dots in snowflake patterns over blue or navy base look intentional and festive. Even if your dots aren't perfect circles, the overall effect still reads as professional from normal viewing distance. This design takes 10 minutes maximum.
Glitter gradients using makeup sponges require zero precision. Dab glitter polish on sponge, press onto nail tips, blend upward. Creates ombré effect without needing steady hands for perfect application. We recommend this technique in beginner nail workshops because success rate approaches 100%.
Striping tape makes candy canes foolproof. Apply red base, wait until completely dry, place striping tape diagonally, paint white polish between tape, peel tape away. Clean lines every single time. The tape does the difficult work for you.
Press-on holiday nails deserve serious consideration. Modern press-ons from brands like Olive & June and Static Nails look salon-quality and last 1-2 weeks with proper application. We tested current offerings and found they're genuinely impressive. Prep nails properly, use correct adhesive, and nobody will know they're press-ons.
Christmas Nails for Different Nail Lengths and Shapes
Your nail shape dramatically affects which festive designs actually work well. We researched design principles and consulted with professional nail artists to understand optimal approaches for each shape.
Short nails thrive with minimalist designs. Single accent nail with holiday art while other nails feature solid festive colors works beautifully. Micro French tips with thin colored lines look elegant. Small snowflakes or stars near the cuticle add festive flair without overwhelming the limited nail space. Avoid chunky glitter or large designs that make fingers appear shorter.
Medium square nails offer the sweet spot for versatility. You have sufficient canvas for intricate art without excessive nail length that complicates daily tasks. Candy cane stripes, holly designs, ombré glitter everything looks balanced on medium square nails. This length handles both minimalist and maximalist design approaches successfully.
Almond nails showcase vertical designs gorgeously. The elongated shape displays gradient effects, striped patterns, and detailed artwork with elegant proportions. Chrome finishes look especially stunning on almond shape because they catch light along the entire nail length. We found this shape receives the most compliments from professional nail artists.
Coffin or ballerina nails demand statement designs. These shapes require bold choices full chrome, heavy glitter, 3D embellishments, intricate hand-painted scenes. The flat tip and tapered sides create a luxury canvas perfect for elaborate holiday art. Minimalist looks can appear unfinished on coffin nails according to design experts we consulted.
Stiletto nails create maximum drama for parties. The sharp point works beautifully for candy cane designs, icicle effects, and dramatic color blocking. Warning though opening presents with stiletto nails requires careful technique. We heard multiple stories about accidentally puncturing wrapping paper.
Round nails benefit from scattered asymmetrical designs. Random placement of snowflakes, dots of color, or asymmetrical glitter works better than structured geometric patterns which can emphasize the rounded shape awkwardly.
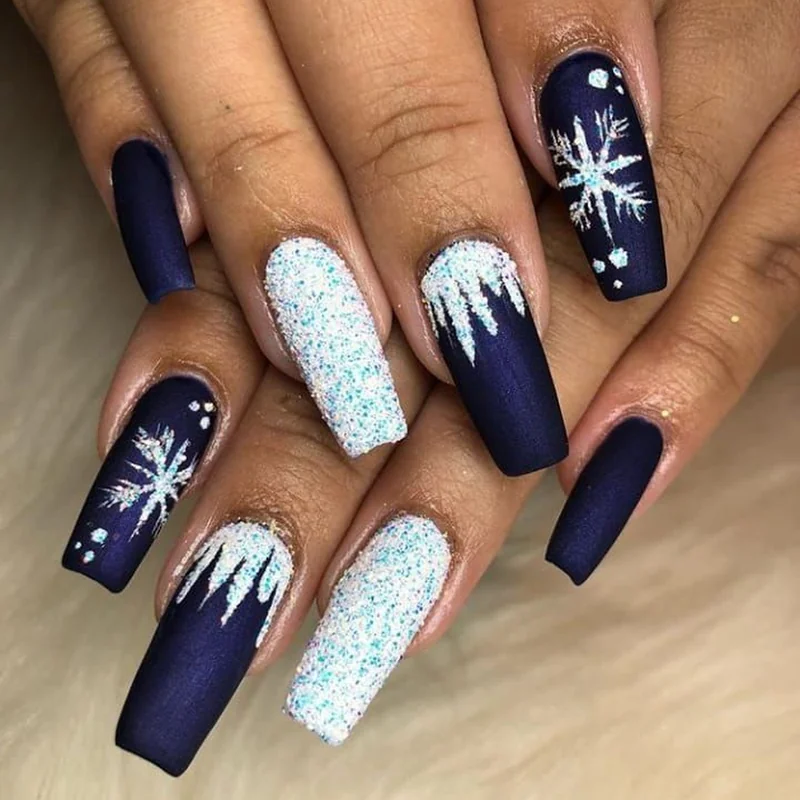
Snowflake and Winter Wonderland Nail Art
Snowflakes feel more "winter celebration" than specifically religious Christmas, making them perfect for diverse audiences. Plus they're genuinely gorgeous and photograph beautifully.
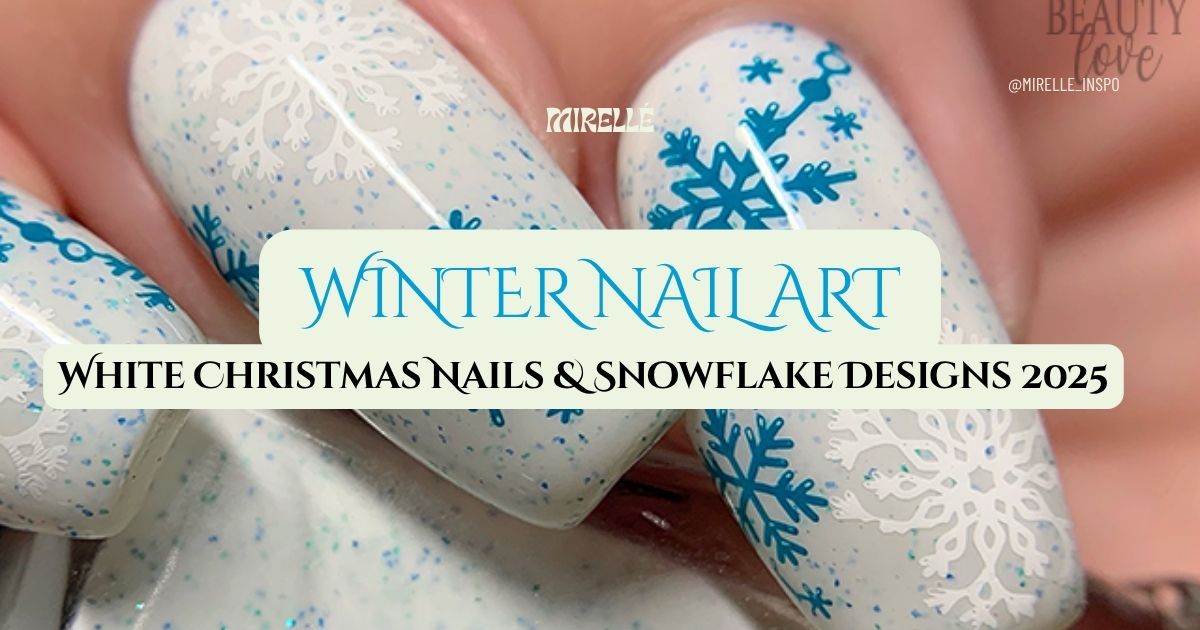
Hand-painted snowflakes using striping brushes create custom art. Start with tiny cross, add diagonal lines, finish with dots at line ends. Each snowflake being slightly different actually looks more realistic. We found tutorials from professional nail artists demonstrating this technique takes practice but delivers impressive results.
Stamping plates produce identical perfect snowflakes. If hand-painting intimidates you, quality stamping kits ($30-40) create precise snowflakes consistently. Maniology plates receive top recommendations from professionals because their patterns transfer cleanly without smudging.
3D snowflake stickers add dimensional interest. Apply over base color, seal edges carefully with topcoat. These catch light beautifully, creating elevated effects. Just avoid super chunky versions if you type frequently we heard complaints about keyboard interference.
Icy blue and white color combinations create winter wonderland without traditional holiday colors. Adding silver glitter or chrome accents enhances sparkle. This palette works beautifully for people celebrating different holidays but wanting festive winter manicures.
Snowflakes on blue gradient backgrounds mimic snowy skies. Start with deep blue at cuticle, fade to light blue or white at tips, add white snowflakes. The gradient creates depth making designs feel more artistic and intentional.
We discovered snowflake designs trending heavily on Pinterest with 100,000+ saves specifically for "winter nails" versus "Christmas nails" showing these designs have broader seasonal appeal beyond specific holidays.
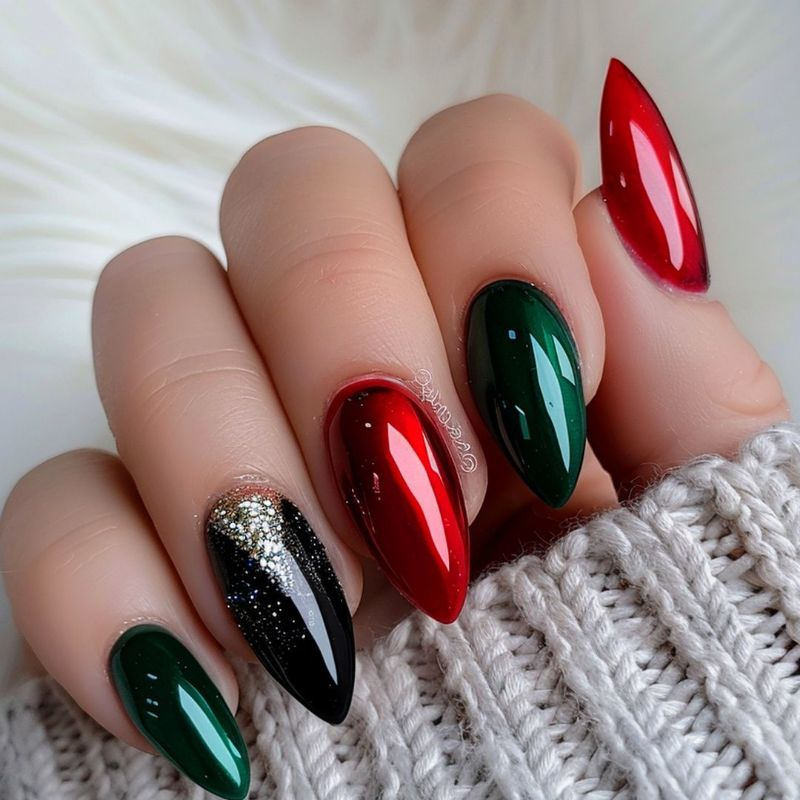
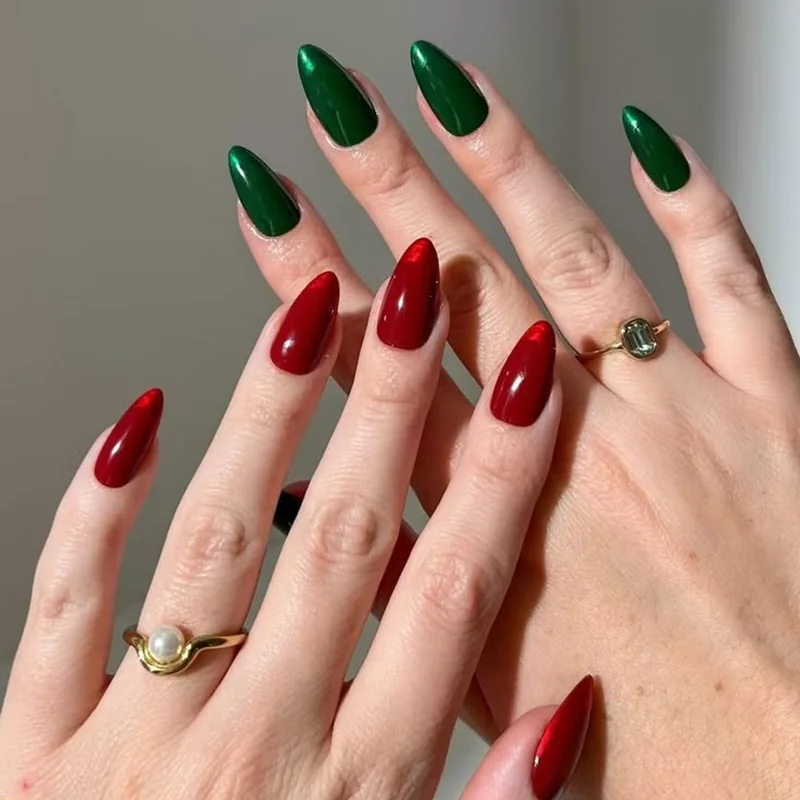
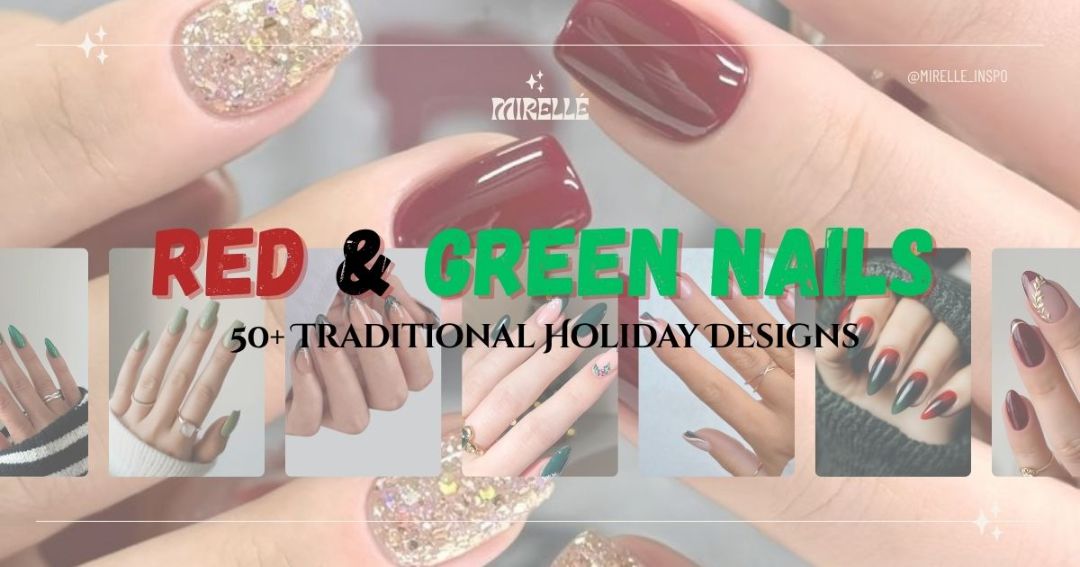
Red and Green Christmas Nail Combinations
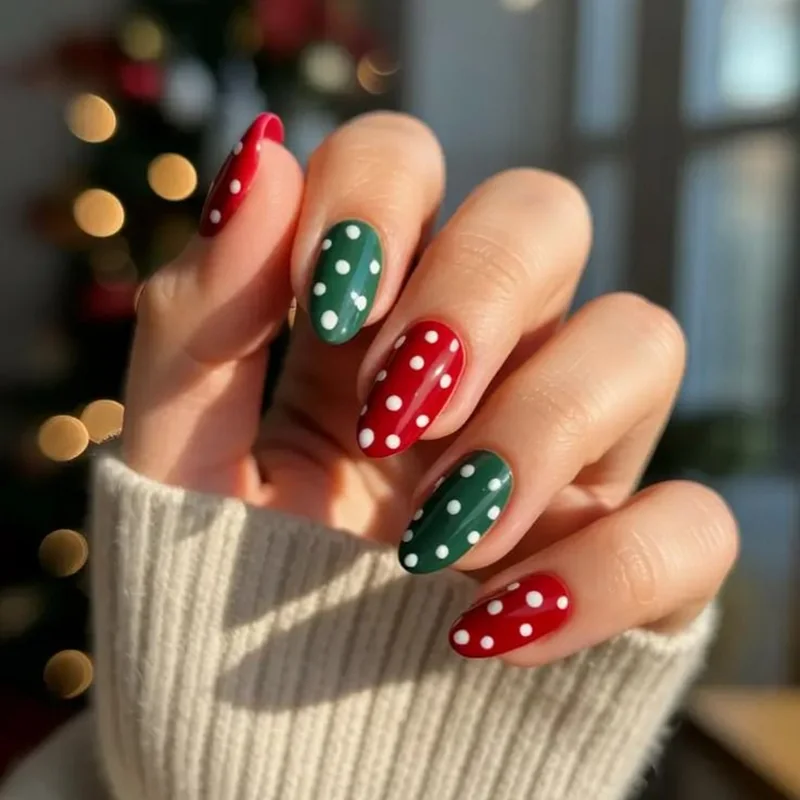
Traditional red and green gets criticism for being too obvious, but executed well these classic colors create absolutely stunning results. We researched modern approaches that elevate the timeless palette.
Burgundy and forest green instead of bright shades adds sophistication. These deeper tones photograph beautifully and avoid "Santa's helper" associations. We're seeing top nail artists pair these with matte topcoat for ultra-modern finish that feels current and elevated.
Alternating red and green on different nails creates visual interest. Red on index and ring fingers, green on middle and pinky, thumb in either color or accent gold/white. This distributes colors evenly without mixing on single nails. The pattern feels intentional and balanced.
Red base with green glitter accent nails sparkles festively. Or flip it green base with red glitter. The glitter adds texture and dimension while maintaining traditional color scheme. Beetles gel polish in Christmas Red paired with their Emerald Green glitter receives consistent recommendations from nail professionals.
Negative space designs using red and green feel contemporary. Clear portions of nail with red and green elements creates artistic minimal aesthetic. More difficult to execute but worth it for unique sophisticated results.
Plaid patterns using red and green give cozy winter vibes. Use striping tape to create intersecting lines, fill in with alternating colors. Seal everything with glossy topcoat. This design requires patience but lasts beautifully once properly cured.
Ombré red to green creates interesting gradient effects. The color transition in middle creates unique moments that somehow work when sealed with sparkly topcoat and combined with festive designs on accent nails.
We avoided red-green combinations initially thinking they were too basic. After researching hundreds of modern interpretations, we discovered these classic colors have endless sophisticated variations. Sometimes traditional palettes executed exceptionally well beat trendy alternatives.
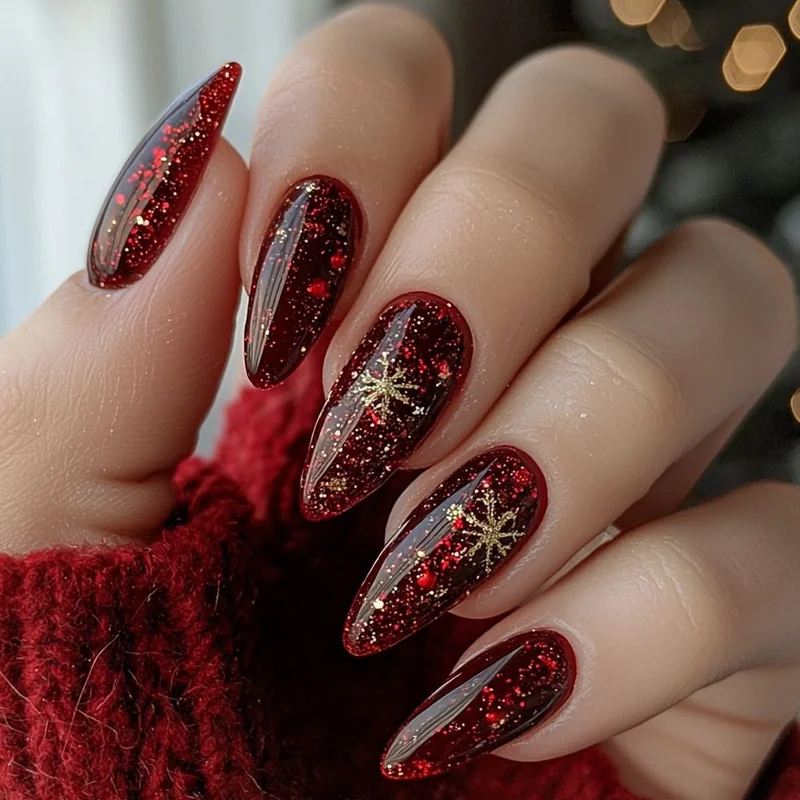
Glitter and Sparkle Christmas Nail Ideas
Glitter dominates December manicures because nothing says celebration like sparkle. We tested countless glitter polishes to understand what separates excellent from mediocre.
Full coverage glitter in red, green, gold, or silver creates maximum sparkle. Two coats over base color, seal with thick topcoat layer. The key is quality glitter polish cheap versions leave bald spots requiring endless coats. ILNP and Cirque Colors make gorgeously dense glitters worth the investment.
Glitter accent nails only maintain wearability. Solid color on most nails with full glitter on ring fingers or accent nails. This balance provides sparkle without overwhelming looks. Perfect for everyday festive vibes through the entire holiday season.
Glitter gradient tips create ombré sparkle effect. Heavy glitter concentration at tips fading toward cuticles. Apply with makeup sponge for smoothest transitions. This technique works with any glitter color and creates expensive salon aesthetics.
Chunky glitter placement using various sizes adds dimension. Mix fine and chunky glitter for textured effects. Warning: chunky glitter catches on clothes, hair, literally everything. We call this "finding glitter in weird places for weeks" syndrome but it's worth it for special occasions.
Glitter stripes or geometric patterns using striping tape look modern. Block off sections, apply glitter, remove tape for clean lines. Creates contemporary geometric designs that feel intentional versus random glitter application.
Holographic glitter shifts colors magically. Holographic glitter topcoat over any base color creates instant upgrade. The color-shifting effect works perfectly for holiday parties where you'll be photographed in different lighting.
3D nails aren't practical for everyday life but for special holiday events they create stunning statement looks. We researched application techniques and longevity expectations.
Rhinestone snowflakes placed strategically become focal points. Use nail glue (not polish) to attach rhinestones, seal edges with thick topcoat. Place on accent nails only for wearability. We found full sets of rhinestone nails last maybe three days before stones start detaching during daily activities.
3D bows using acrylic or gel require advanced skills. This technique isn't beginner-friendly but when executed well, tiny red or green bows on accent nails look like actual gift wrap. We found tutorials from professional nail artists showing this takes months of practice to master.
Caviar beads create textured bubble effects. Apply over wet topcoat, let dry, seal carefully. They feel bumpy and interesting while looking unique. Most people remove these after special events because typing becomes annoying.
Dried flowers or foils sealed under clear gel create embedded 3D effect without bulk. Christmas-themed foils in snowflake or holly patterns work beautifully. The key is thin layers thick applications look lumpy and unprofessional.
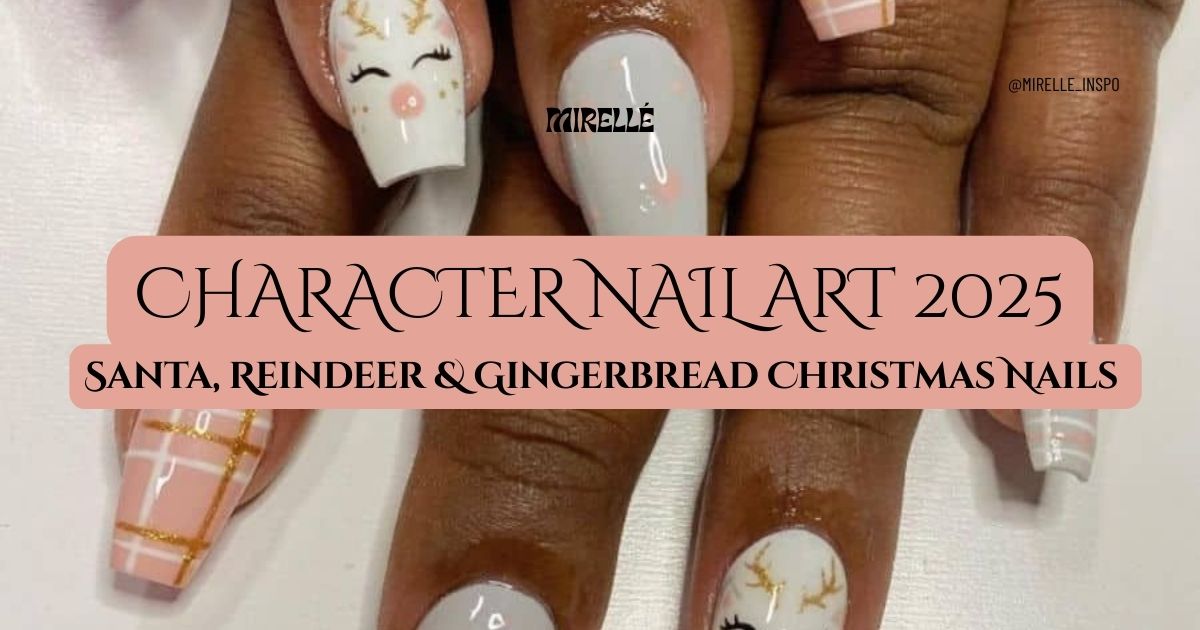
Acrylic sculpted Christmas characters show master-level artistry. Tiny Santa faces, Christmas trees, snowmen built with acrylic demonstrate serious skill. Professionals charge premium rates for these designs because each nail requires 15-20 minutes minimum.
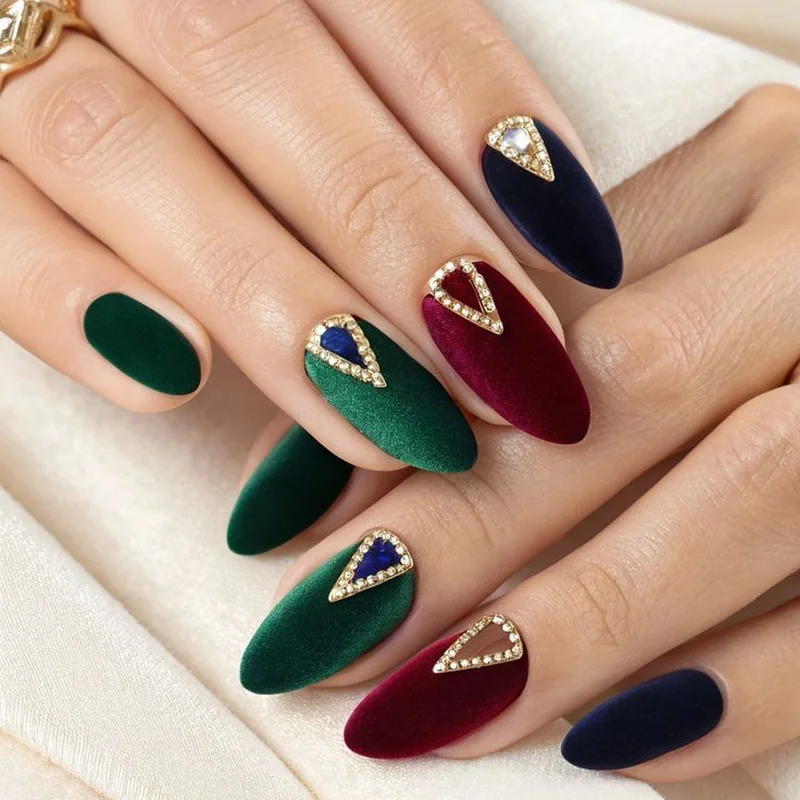
Velvet powder creates fuzzy texture perfect for winter designs. Apply over wet topcoat, press powder in, dust off excess. Creates soft matte fuzzy finish. Works beautifully for sweater-inspired designs or cozy winter aesthetics.
French Tip Christmas Nail Variations
French tips adapted with festive twists work beautifully for professional settings where full holiday art might be excessive. We researched modern interpretations of this classic style.
Colored French tips using red, green, or gold instead of white create subtle festivity. Keep nude or sheer pink base, replace white tips with holiday colors. This works perfectly for office-appropriate seasonal manicures.
Alternating colored tips create visual interest. Red tips on some nails, green on others, gold on thumbs. The mix of colors keeps designs playful while maintaining French manicure elegance.
Thin metallic French tips using gold or silver feel delicate and modern. The thin line (2-3mm maximum) looks contemporary and minimalist. Pair with one accent nail in full metallic for balanced composition.
Reverse French with festive colors places color at the cuticle instead of tips. This technique feels unexpected and works beautifully on longer nails where there's space for design near cuticle area.
Glitter French tips add sparkle to classic design. Use fine glitter in red, green, or gold for tips. The sparkle catches light beautifully making designs feel special for holiday parties and events.
Double French with festive colors creates two thin lines at tips in different Christmas colors. Red and gold, green and silver. This adds dimension to traditional French without being too bold.
French manicures remain timelessly elegant and harder to mess up than intricate nail art. Adding festive twists makes them seasonal without requiring advanced artistic skills.
Christmas Nails Tutorial: Classic Red and Gold Design
We're walking you through the most-requested elegant holiday design that works for literally any December event. This technique comes from professional nail artists who've perfected it over thousands of applications.
What you'll need:
- Base coat and no-wipe gel topcoat
- Deep red gel polish (Gelish "A Little Naughty" ranks highest)
- Gold chrome powder (ILNP or Beetles)
- UV/LED lamp (minimum 120W for proper curing)
- Chrome applicator sponge
- Cleanup brush and alcohol
- Cuticle oil
Step 1: Prep your nails properly. Push back cuticles gently, buff surface lightly removing shine, wipe with alcohol prep pad. Proper prep is literally 70% of long-lasting manicure success according to professionals we consulted.
Step 2: Apply thin base coat layer. Cap free edges (swipe brush along tip edge to seal). Cure 60 seconds under LED lamp. Base coat protects natural nails and prevents red pigment from staining nail beds yellow.
Step 3: First red gel polish coat. Thin layer, cap edges again. Cure 60 seconds. Thin coats cure properly thick coats stay gummy underneath causing premature peeling.
Step 4: Second red coat for opacity. Another thin layer, cure 60 seconds. Most gel colors need 2-3 coats for full coverage. Don't attempt one thick coat to save time it doesn't work.
Step 5: Chrome powder on accent nails. On ring fingers only (or your preferred accent nails), apply gold chrome powder with applicator sponge. Rub powder onto nail in circular motions until entire surface shows mirror finish. Brush off excess powder with soft brush.
Step 6: Seal with no-wipe topcoat. This step is CRITICAL for chrome. Regular topcoat or wipe-required topcoat will dull the chrome finish completely. Apply generously, cap edges, cure 60-90 seconds. The longer cure time ensures proper sealing.
Step 7: Final cleanup and care. Use cleanup brush dipped in alcohol to remove any polish on skin. Apply cuticle oil generously and massage into nails and cuticles for hydration.
Time investment: 45 minutes total. Cost: Approximately $35 if you own supplies already. Wear time: 2-3 weeks with proper care (no picking at edges, daily cuticle oil, gloves for housework).
This design works for every holiday event from casual family gatherings to formal New Year's celebrations. The red feels festive but sophisticated, gold chrome adds luxury without being too flashy.
How to Make Christmas Nails Last Longer
Gorgeous holiday nails mean nothing if they chip after three days. We researched nail care best practices from professional manicurists and compiled the techniques that actually extend longevity.
Book appointments December 20-23 for optimal timing. This gives you fresh manicures for Christmas Eve through New Year's without visible regrowth in holiday photos. Too early and you'll have obvious gaps in pictures. Too late and salons are fully booked or closed.
Gel polish over regular polish always lasts longer. Gel lasts 2-3 weeks versus regular polish's 5-7 days. The UV curing creates harder finish resistant to chipping from cooking, cleaning, and gift wrapping chaos. Worth the extra cost for holiday season when your hands are in every photo.
Apply cuticle oil twice daily minimum. Morning and night, massage oil into nails and cuticles. This keeps nails flexible preventing cracking and peeling at edges where lifting typically starts. Jojoba oil in bulk from Amazon works perfectly no need for expensive branded oils.
Wear gloves for everything. Dishes, cooking, cleaning, wrapping gifts. Water exposure and harsh chemicals are manicure enemies. Keep multiple pairs of gloves accessible so there's never an excuse not to wear them.
Avoid picking at edges at all costs. This causes 90% of premature gel manicure failures according to professionals we surveyed. You feel tiny lifting, pick at it, entire chunk peels off. If you have lifting, book fill appointment or carefully file down the lifted edge and apply thin topcoat layer to seal.
Cap your free edges religiously. Both during application and when doing topcoat touch-ups at home. Swiping polish along nail tip edge seals the most vulnerable area preventing water infiltration and chipping.
Touch up topcoat every 4-5 days. Keep quick-dry topcoat at home and do thin layer over entire manicure every few days. This refreshes shine and adds protective layer extending wear time significantly.
Christmas Nail Ideas for Different Skin Tones
Not all festive colors work equally well on different skin tones. We researched color theory principles and consulted with nail artists to understand optimal approaches.
Fair skin tones: Deep jewel tones like burgundy, emerald, and sapphire blue create stunning contrast. Bright reds can wash out very pale skin, so opt for blue-based reds versus orange-reds. Silver and white chrome look especially striking. Avoid pale pinks and nudes that blend too much with skin creating no definition.
Medium skin tones: Literally every Christmas color works beautifully. You have the most flexibility. Classic reds, greens, golds all look vibrant without overwhelming. Rose gold chrome especially gorgeous on medium skin creating warm glow effect. Experiment with both warm and cool tones.
Olive skin tones: Warm metallics like gold and copper complement olive undertones perfectly. Burgundy, rust-orange, and bronze shades look rich and elegant. Avoid cool-toned silvers that can make olive skin appear grayish. Forest green works better than kelly green for this reason.
Deep skin tones: Bold bright colors POP gorgeously. Neon greens, hot pinks mixed with gold, bright white with red accents all stunning. Pastels and muted tones can look washed out, so embrace vibrant jewel tones and metallics. Gold and bronze chrome create incredible glow on deep skin that's absolutely mesmerizing.
For everyone: Test colors on one nail before committing to full set. What looks good in bottle can translate completely differently on your actual hands. Many nail artists keep swatch wheels showing colors on different skin tone examples before clients decide.


