Why 2026 Makes Nail Art Easier Than Ever
The nail industry underwent a quiet revolution. Maximalist designs that required salon expertise have given way to techniques anyone can master. This shift happened for good reason: modern life demands practicality, and elaborate nail art doesn't survive daily tasks.
Current trending designs glass nails, aura effects, micro French tips, single accent nails all emphasize technique over complexity. They look professional because they're well-executed simple designs, not because they're intricate. This distinction matters enormously for beginners. You're not learning a simplified version of nail art. You're learning actual current trends.


What You Actually Need to Start

The bare essentials: base coat, two to three nail polish colors, and top coat. That's it. These four items enable every design in this guide.
Household tools replace professional equipment:
Toothpick
Creates perfect dots, drags patterns, makes flowers. Your most versatile tool.
Bobby Pin
Press both ends simultaneously for instant hearts. Drag for double lines.
Scotch Tape
Creates clean straight lines, geometric patterns, perfect French tips.
Makeup Sponge
Blends ombre effects, creates aura nails, applies glitter gradients.
Budget Reality
Complete starter setup costs under fifteen dollars at drugstores. Base coat, two polishes, top coat, and household tools you already own. Professional nail art kits aren't necessary for learning.
Preparation: The Unsexy Foundation


Nail art succeeds or fails during preparation. Polish adheres better to properly prepped nails, designs stay cleaner, and results look professional rather than amateur. This isn't optional groundwork it's the difference between manicures lasting three days versus three weeks.
The process takes five minutes: Remove old polish completely. Wash hands with soap to eliminate oils. File nails to desired shape in one direction only. Gently push back cuticles. Buff nail surface lightly. Apply thin base coat layer.
Base coat isn't decorative it creates the adhesive layer between your natural nail and polish, prevents staining from dark colors, and extends manicure longevity significantly. Never skip it.
Start Here: Ultra Easy Designs
These five designs require zero artistic ability. If you can paint your nails a solid color, you can do these. Begin with any one and master it before progressing.
1. Single Color Perfection
Difficulty: ★☆☆ | Time: 10 minutes

What you're mastering: Even application, thin coats, proper drying time. These fundamentals support every future design.
Steps: Apply base coat. Apply first thin polish layer. Wait three minutes. Apply second thin coat. Wait five minutes. Apply top coat.
Pro tip: Thin coats dry faster and look smoother than thick ones. Build color through multiple thin layers rather than one thick application.
2. Simple Glitter Tips
Difficulty: ★☆☆ | Time: 12 minutes

Why it works: Glitter hides imperfections. Messy application looks intentional. No precision required.
Steps: Apply base color completely. Let dry fully. Paint glitter polish only on nail tips. Apply liberally more glitter means easier application. Seal with top coat.
Common mistake: Applying glitter before base color dries. Wait the full five minutes.
3. One-Finger Accent Nail
Difficulty: ★☆☆ | Time: 12 minutes

Why it's trending: 2026's minimalist aesthetic embraces single statement nails. This isn't a beginner compromise it's genuinely fashionable.
Steps: Choose two colors. Paint four nails one color. Paint ring finger (or any finger) the contrasting color. Both get base and top coats.
Color combinations that work: Nude with burgundy. White with black. Soft pink with gold.
4. Half and Half Color Block
Difficulty: ★☆☆ | Time: 15 minutes

Your first tape technique: Scotch tape creates a perfectly straight line without steady hands.
Steps: Paint entire nail first color. Let dry completely this is crucial. Place tape diagonally across nail. Paint exposed half second color. Remove tape while polish is still wet. Apply top coat once fully dry.
Critical timing: Remove tape before the second color dries, or it will peel off with the tape.
5. Random Dots
Difficulty: ★☆☆ | Time: 10 minutes


The most forgiving design: Dots don't need patterns or spacing. Random placement looks artistic, not accidental.
Steps: Apply base color. Drop small amount of contrasting polish on paper or plastic. Dip toothpick tip in polish. Touch toothpick to nail dot appears. Repeat randomly across nails. No pattern needed. Seal with top coat.
Why beginners love this: Impossible to mess up. Every attempt looks intentional.
Ready for More: Super Easy Designs
Once you've mastered basic application and simple dots, these seven designs introduce new techniques while remaining genuinely achievable.
6. Classic Polka Dots
Difficulty: ★★☆ | Time: 15 minutes

Building on random dots: Same technique, now with spacing awareness.
Steps: Create dots in a line across nail center first. This establishes spacing. Fill in additional dots using that spacing as reference. Don't obsess over perfect alignment slight variation adds charm.
Pro tip: Start with larger dots using toothpick's blunt end. Smaller dots come from the pointed end.
7. Simple French Tips
Difficulty: ★★☆ | Time: 18 minutes


Two methods: Freehand for practice, tape-assisted for perfection.
Tape method: Apply base color. Let dry. Place tape curved across nail tip. Paint exposed tip white. Remove tape immediately. Top coat.
2026 variation: Micro French tips use very thin lines instead of thick white tips. Easier to paint and more modern.
8. Vertical Stripes
Difficulty: ★★☆ | Time: 20 minutes

Tape does the work: Cut thin strips of tape for precise lines without artistic skill.
Steps: Paint base color. Dry completely. Place thin tape strips vertically. Paint contrasting color over entire nail. Remove tape while wet. Top coat when dry.
Design variation: Alternate stripe widths for visual interest. Mix thick and thin strips.
9. Glitter Gradient
Difficulty: ★★☆ | Time: 15 minutes

Your first sponge technique: Makeup sponge creates professional-looking gradients effortlessly.
Steps: Apply solid base color. Dry fully. Paint glitter polish onto small makeup sponge. Dab sponge repeatedly from tip toward middle. Concentrate more dabs at tip, fewer toward base. Creates fade effect. Top coat seals and smooths.
Why it works: Sponge's texture creates natural gradient. No blending skill needed.
10. Two-Tone Ombre
Difficulty: ★★☆ | Time: 20 minutes


Building on glitter gradient: Same sponge method, different application.
Steps: Paint lightest color as base. Paint both colors side by side on sponge they should touch. Dab sponge onto nail repeatedly. Colors blend where they meet on sponge. Reapply colors to sponge between nails. Top coat smooths texture.
Common mistake: Using too-wet sponge floods cuticles. Dab excess polish off first.
11. Tiny Hearts
Difficulty: ★★☆ | Time: 12 minutes

Bobby pin magic: Both rounded ends pressed simultaneously create instant hearts.
Steps: Apply base color. Drop contrasting polish on paper. Dip both bobby pin ends in polish. Press both ends onto nail at same angle heart appears. One press equals one heart. Spacing doesn't matter. Top coat.
Pro tip: Smaller bobby pins create daintier hearts. Experiment with sizes.
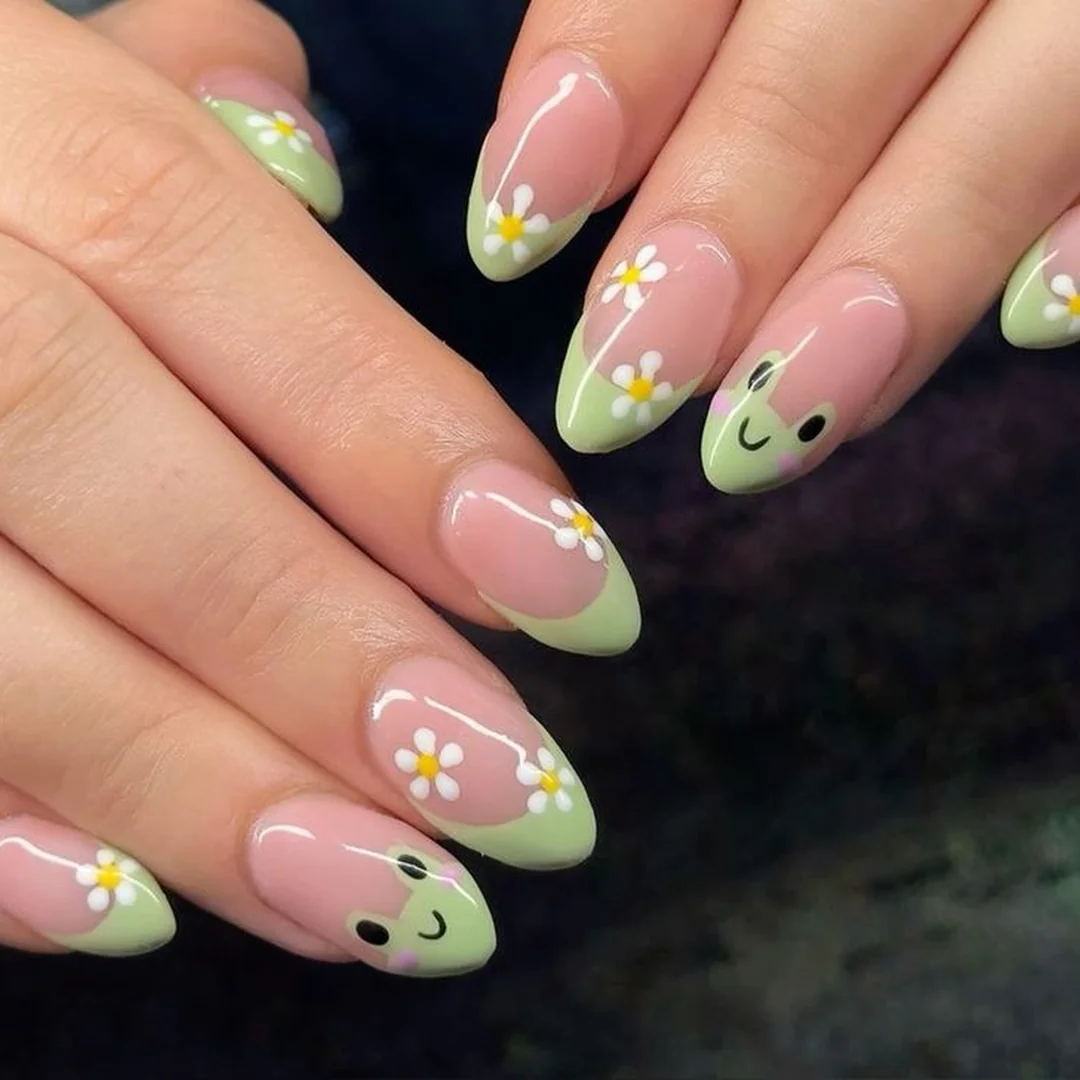
12. Five-Dot Flower
Difficulty: ★★☆ | Time: 15 minutes

TikTok's viral technique: This simple method gained 45 million views for good reason it actually works.
Steps: Create one center dot. Create four dots around it in circle formation. Optional: Add different color dot in center. Creates instant flower. Repeat across nails. Spacing imperfection adds organic feel.
Why it's perfect: Looks detailed and artistic but requires only dots a technique you've already mastered.
2026 Trends You Can Actually Do
These six designs dominate social media and runways right now. All remain genuinely beginner-friendly despite their trendy appearance.
13. Aura Nails
Difficulty: ★★☆ | Time: 15 minutes

The eyeshadow hack: Use makeup you already own to create dreamy gradients.
Steps: Apply white or nude base. Let dry. Apply eyeshadow to sponge (any color works). Dab concentrated color at cuticle area. Dab lighter toward tips. Creates soft glow effect. Top coat seals eyeshadow.
Why it works: Eyeshadow's fine texture blends beautifully. No airbrush needed.
14. Soap Nails
Difficulty: ★☆☆ | Time: 10 minutes

Hailey Bieber's latest: Easier than glazed donuts, equally trendy.
Steps: Use milky or sheer white polish. One to two thin coats. Let dry completely. Apply glossy top coat multiple layers for extra shine. Creates fresh, clean aesthetic.
Why beginners love it: Sheer formula hides application imperfections. Looks expensive, requires minimal skill.
15. Glass Nails DIY
Difficulty: ★☆☆ | Time: 10 minutes


The secret: Multiple top coat layers create glass effect without salon equipment.
Steps: Apply any base color. Dry completely. Apply thin top coat layer. Dry. Repeat three to four times. Each layer increases shine. Final result appears liquid-like.
Investment tip: Quality top coat matters here. But one bottle lasts months.
16. Negative Space Lines
Difficulty: ★★☆ | Time: 18 minutes

Less is more: Leaving natural nail exposed creates sophisticated designs.
Steps: No base color needed. Place tape creating geometric patterns. Paint over entire nail. Remove tape immediately. Natural nail shows through where tape was. Top coat entire nail.
Design advantage: Mistakes become part of artistic intention. Imperfection looks deliberate.
17. Jelly Nails
Difficulty: ★☆☆ | Time: 12 minutes

Forgiving formula: Translucent polishes hide streaks and uneven application.
Steps: Use sheer jelly-finish polish. Apply two to three thin coats color builds with each layer. Top coat adds extra dimension. Available in every color now.
Why it works: See-through quality means imperfect application looks intentional. Very beginner-friendly.
18. Mocha Mousse Solid
Difficulty: ★☆☆ | Time: 10 minutes

Pantone 2026 color: Everyone's wearing this warm chocolate brown shade.
Steps: Standard single color application in mocha brown. Two thin coats. Top coat for shine. That's the complete design.
Why it's perfect: On-trend without requiring technique. Simply wearing the right color makes nails current.
Common Mistakes and Actual Solutions

Skipping Base or Top Coat
Why it happens: Seems unnecessary. Adds time.
Reality: Base coat prevents staining and improves adhesion. Top coat seals design and adds longevity. Both are non-negotiable for results lasting beyond three days.
Not Waiting for Drying
Why it happens: Impatience. Surface feels dry.
Reality: Polish dries in layers. Surface dries first while underneath remains wet. Wait minimum three minutes between coats, five before top coat. This prevents smudging, bubbling, and peeling.
Too-Thick Coats
Why it happens: Trying to achieve opacity quickly.
Reality: Thick coats take forever to dry, bubble easily, and peel quickly. Two to three thin coats always outperform one thick coat. Build color gradually.
Messy Cuticles
Why it happens: Unsteady hands. Polish pools at cuticle.
Reality: Keep cotton swab dipped in acetone nearby. Clean edges immediately after polishing each nail. Alternatively, apply petroleum jelly around cuticles before polishing wipes off easily with polish.
The Non-Dominant Hand Challenge
Everyone struggles painting their non-dominant hand. Professional nail artists struggle. This isn't personal failure it's biomechanics. Your non-dominant hand hasn't developed fine motor control for detailed tasks.
Strategies that actually help: Start with simpler designs on your non-dominant hand. If doing dots on your dominant hand, do solid color on non-dominant. Use tape and stencils more liberally. Rest both hands on table for stability. Take twice as long rushing guarantees mess.
Alternative approach: Embrace asymmetry as artistic choice. Make different designs intentional. 2026 celebrates mismatched nails as fashionable, not flawed.
Reality check: Your non-dominant hand will never match your dominant hand's precision. Accept this. Practice improves it but won't eliminate the difference. That's okay.
Questions Beginners Actually Ask
Do I need gel polish or can I use regular?
Regular polish works perfectly for learning. Gel requires UV lamp and different removal process. Master techniques with regular polish first. Transition to gel later if desired.
How long should I practice before trying on real nails?
Practice isn't required. Your real nails are practice. First attempts teach more than practicing on fake nails. Just start. Every manicure improves your skill.
What if I don't have artistic talent?
Nail art doesn't require artistic talent. It requires following steps. These designs use mechanical techniques dots, tape, sponges not freehand artistry. Anyone can learn mechanical processes.
How do I fix a mistake without starting over?
Dip cotton swab in acetone. Clean the mistake immediately while polish is wet. Reapply that section only. For dried mistakes, carefully scrape with toothpick, then touch up with fresh polish.
Can I do nail art on short nails?
Every design in this guide works on short nails. In fact, shorter nails often look cleaner because there's less surface area for mistakes. Natural short nails are trending in 2026.
Why does my polish chip the next day?
Usually caused by skipping base coat, not wrapping tips (painting polish over nail edge), or exposing nails to hot water too soon. Wait at least two hours before washing dishes or showering.
Begin Today
Nail art in 2026 belongs to everyone, not just professionals. The barrier to entry has never been lower. Trending designs favor simplicity. Household items replace expensive tools. And the nail art community increasingly celebrates beginner work rather than gatekeeping expertise.
Your first attempts won't be perfect. They shouldn't be. Perfection comes from repetition, and repetition requires starting. Choose the simplest design that appeals to you. Gather your supplies base coat, polish, top coat, toothpick. Set aside fifteen minutes. Begin.
You'll learn more from one completed design than from reading ten tutorials. The knowledge moves from theoretical to practical only through doing. Every design in this guide started with someone's imperfect first attempt. Yours will too. That's the actual process. Begin today.